Writing Munin Plugins pt2: counting VPNd Connections
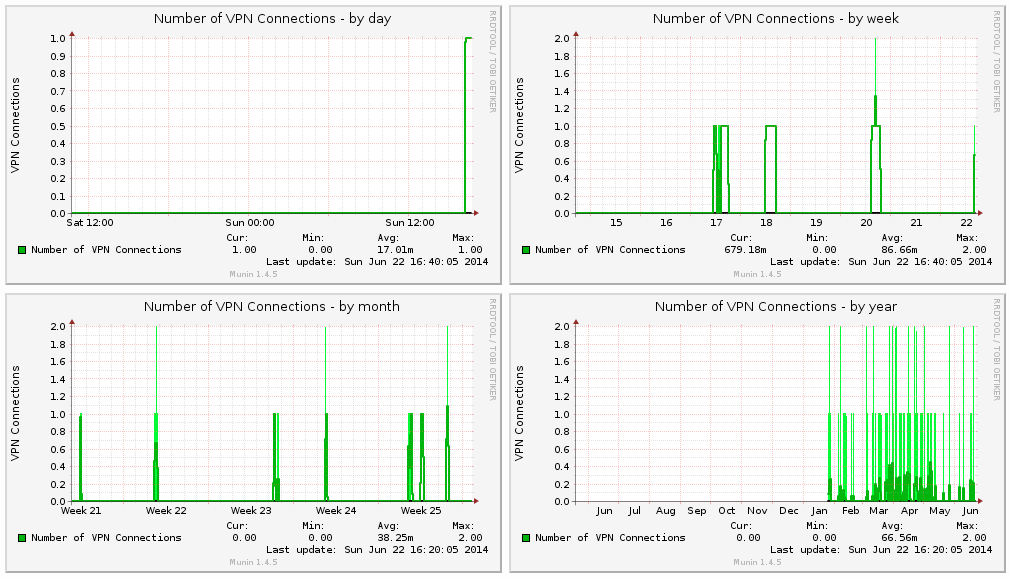
Flattr this!

Preamble

Every Munin Plugin should have a preamble by default:

#!/usr/bin/env perl
# -*- perl -*-

=head1 NAME

dar_vpnd a Plugin for displaying VPN Stats for the Darwin (MacOS) vpnd Service.

=head1 INTERPRETATION

The Plugin displays the number of active VPN connections.

=head1 CONFIGURATION

No Configuration necessary!

=head1 AUTHOR

Philipp Haussleiter <philipp@haussleiter.de> (email)

=head1 LICENSE

GPLv2

=cut

# MAIN
use warnings;
use strict;

As you can see, this Plugin will use Perl as the Plugin language.

After that you have some information about the Plugin Usage:

  • Name of the Plugin + some description
  • Interpretation of the delivered Data
  • Information about the Plugins Configuration (not necessary here, we will see that in the other Plugins)
  • Author Name + Contact Email
  • License

# MAIN marks the beginngin of the (main) code.

Next you see some Perl Setup, using strict Statements and also show warnings.

Gathering Data

First you should always have a basic idea how you want collect your Data (e.g. which user will use what command to get what kind of data).

For Example we can get all VPN Connections in Mac OS (Server) searching the process List for pppd processes.

ps -ef | grep ppp
    0   144     1   0  5Mär14 ??        10:35.34 vpnd -x -i com.apple.ppp.l2tp
    0 29881   144   0  4:12pm ??         0:00.04 pppd serverid com.apple.ppp.l2tp nodetach proxyarp plugin L2TP.ppp ms-dns 10.XXX.YYY.1 debug logfile /var/log/ppp/vpnd.log idle 7200 noidlesend lcp-echo-interval 60 lcp-echo-failure 5 mru 1500 mtu 1280 receive-all ip-src-address-filter 1 novj noccp intercept-dhcp require-mschap-v2 plugin DSAuth.ppp plugin2 DSACL.ppp l2tpmode answer :10.XXX.YYY.233
    0 22567   144   0  4:12pm ??         0:00.04 pppd serverid com.apple.ppp.l2tp nodetach proxyarp plugin L2TP.ppp ms-dns 10.XXX.YYY.1 debug logfile /var/log/ppp/vpnd.log idle 7200 noidlesend lcp-echo-interval 60 lcp-echo-failure 5 mru 1500 mtu 1080 receive-all ip-src-address-filter 1 novj noccp intercept-dhcp require-mschap-v2 plugin DSAuth.ppp plugin2 DSACL.ppp l2tpmode answer :10.XXX.YYY.234    

Collecting only the IP you need some more RegExp using awk:

ps -ef | awk '/[p]ppd/ {print substr($NF,2);}'
10.XXX.YYY.233
10.XXX.YYY.234

We are only interested in the total Connection Count. So we use wc for counting all IPs:

ps -ef | awk '/[p]ppd/ {print substr($NF,2);}' | wc -l
       2

So we now have a basic command that gives us the Count of currentyl connected users.

Configuration

The next thing is how your Data should be handled by the Munin System.
Your Plugin needs to provide Information about the Field Setup.

The most basic (Perl) Code looks like this:

if ( exists $ARGV[0] and $ARGV[0] eq "config" ) {
    # Config Output
    print "...";    
} else {
    # Data Output
    print "...";
}

For a more Information about fieldnames, please follow the above Link.

Our Plugin Source looks like this:

# MAIN
use warnings;
use strict;


my $cmd = "ps -ef | awk '/[p]ppd/ {print substr(\$NF,2);}' | wc -l";

if ( exists $ARGV[0] and $ARGV[0] eq "config" ) {
    print "graph_category VPN\n";
    print "graph_args --base 1024 -r --lower-limit 0\n";    
    print "graph_title Number of VPN Connections\n";
    print "graph_vlabel VPN Connections\n";
    print "graph_info The Graph shows the Number of VPN Connections\n"; 
    print "connections.label Number of VPN Connections\n";
    print "connections.type GAUGE\n";   
} else {
    my $output = `$cmd`;
    print "connections.value $output";
}

Implementation

To test the Plugin you can use munin-run:

> /opt/local/sbin/munin-run dar_vpnd config
graph_category VPN
graph_args --base 1024 -r --lower-limit 0
graph_title Number of VPN Connections
graph_vlabel VPN Connections
graph_info The Graph shows the Number of VPN Connections
connections.label Number of VPN Connections
connections.type GAUGE
> /opt/local/sbin/munin-run dar_vpnd
connections.value        1

Example Graphs

Some basic (long time) Graphs look like this:

munin_vpnd_connections_macos

Writing Munin Plugins pt1: Overview

Flattr this!

Writing your own Munin Plugins

Around February this year, we at innoQ had the need for setting up a Mac OS based CI for a Project. Besides building of integrating some standard Java Software, we also had to setup an Test Environment with Solaris/Weblogic, Mac OS for doing a CI for an iOS Application and a Linux System that contains the Jenkins CI itself.
Additionally the whole Setup should be reachable via VPN (also the iOS Application itself should be able to reach the Ressources via VPN).

To have the least possible obsticles in Setting up the iOS CI and the iOS (iPad) VPN Access, we decide to use Mac OS Server as the Basic Host OS. As the Need for Resources are somehow limited for the other Systems (Solaris/Weblogic, Linux/Jenkins), we also decide to do a basic VM Setup with VMWare Fusion.

Since we have a decent Munin Monitoring Setup in our Company for all our Systems, we need some Monitoring for all Services used in our Setup:

Beside the Standard Plugins (like Network/CPU/RAM/Disk) that was basically

  • Jenkins CI
  • VMware Fusion
  • VPN

After searching through the Munin Plugin Repository we couldn’t find any plugins providing the necessary monitoring. So the only choice was to write your own set of plugins. Since all three Plugins use different Approaches for collecting the Data, i plan two writer three different posts here. One for each Plugin. The Sources are availible online here and might be added to the main Munin Repo as soon as the Pull Requests are accepted.

How Munin works

But first a brief overview of Munin. Munin is a TCP based Service that has normally one Master and one Node for each System that needs to be monitored. The Master Node ask all Nodes periodicly for Monitoring Updates.
The Node Service, delivering the Updated Data runs on Port 4949 per default. To add some level of security, you normal add a IP to a whitelist, that is allowed to query the Nodes Data.

You can use normal telnet for accessing the Nodes Data:

telnet localhost 4949
Trying ::1...
telnet: connect to address ::1: Connection refused
Trying 127.0.0.1...
Connected to localhost.
Escape character is '^]'.
# munin node at amun

Every Node delivers Information about specific Services provided by Plugins. To get an overview about the configured plugins you do a:

# munin node at amun
list
df df_inode fusion_mem fusion_pcpu fusion_pmem if_en0 if_err_en0 load lpstat netstat ntp_offset processes users

A Plugin always provides a Configuration Output and a Data Output. By Default if you query a Plugin, you will always get the Data Output:

# munin node at amun
df
_dev_disk1s2.value 34
_dev_disk0s1.value 48
_dev_disk3s2.value 62
_dev_disk2s1.value 6
_dev_disk2s2.value 32

To trigger the Config Output you need to add a config to your command:

# munin node at amun
df config
graph_title Filesystem usage (in %)
graph_args --upper-limit 100 -l 0
graph_vlabel %
graph_scale no
_dev_disk0s1.label /Volumes/Untitled
_dev_disk1s2.label /
_dev_disk2s1.label /Volumes/System-reserviert
_dev_disk2s2.label /Volumes/Windows 7
_dev_disk3s2.label /Volumes/Data

You can also use the tool munin-run for doing a basic test (it will be installed when installing your munin-node Binary)

 munin-run df
_dev_disk1s2.value 34
_dev_disk0s1.value 48
_dev_disk3s2.value 62
_dev_disk2s1.value 6
_dev_disk2s2.value 32
munin-run df config
graph_title Filesystem usage (in %)
graph_args --upper-limit 100 -l 0
graph_vlabel %
graph_scale no
_dev_disk0s1.label /Volumes/Untitled
_dev_disk1s2.label /
_dev_disk2s1.label /Volumes/System-reserviert
_dev_disk2s2.label /Volumes/Windows 7
_dev_disk3s2.label /Volumes/Data

Summary

So a Plugin needs to provide an Output both modes:

  • Configuration Output when run with the config argument
  • The (normal) Data Output when called withouth additional arguments

Plugins are Shell Scripts that can be written in every Programming language that is supported by the Nodes Shell (e.g. Bash, Perl, Python, etc.)

Since it is one of the easier Plugins we will have a look at the Plugin, monitoring the VPN Connections at our Mac OS Server in the next Post.