Fixing nix Setup on MacOS Catalina
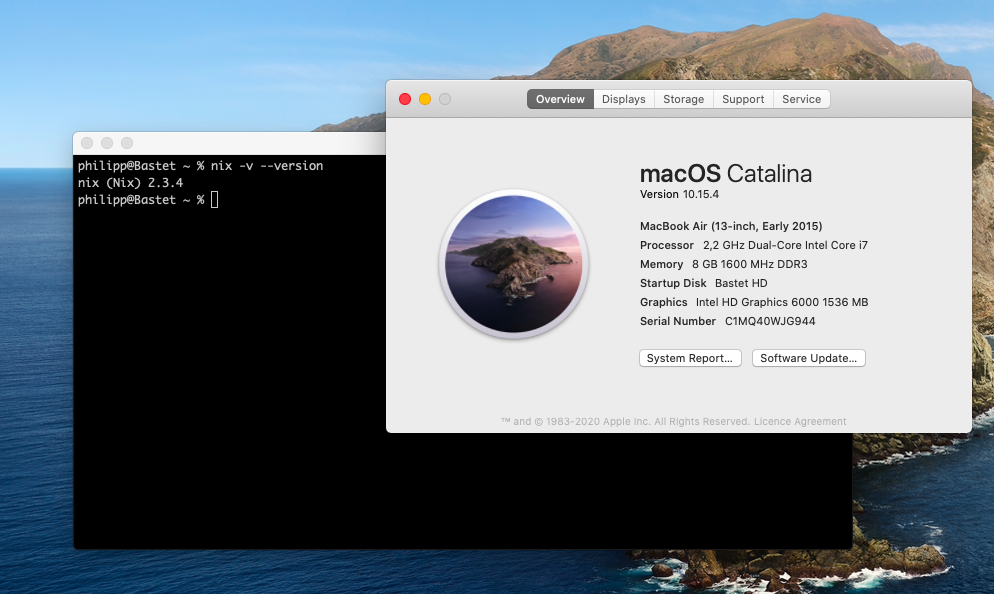
Flattr this!

With MacOS Catalina (10.15), Apple decided to decrease the possibilities of system users to install software applications within the system. That means, that it is not possible anymore to install software at specific location in your system, since most system folder ware mounted read-only at boot to improve the overall system security.

That leads to an installation error if you want to install Nix in MacOS Catalina /nix will not be writable on macOS Catalina #2925 .

In another Issue above there are three Options mentioned by user garyverhaegen-da to circumvent this problem, all with some more or less hefty drawbacks.

The good thing is, that with the use of the APFS System, it is very easy possible to setup a specific FS for nix without the use of an DMG Image and mount it under the correct /nix path.

These are the steps you can do to fix the problem:

!! This approach does only work if you have a Disk that is formated with APFS
(that should always be the case, if your OS is running of a SSD).

You can check this with:

% diskutil list | grep APFS

…
0:      APFS Container Scheme -                      +250.8 GB   disk1
…

Of you have an output here, everything is fine. Otherwise you might have a look into How to Convert to APFS .

1 Create another Volume on your Disk for NIX

This can be done via the Disk Utility Program,

or via the CLI:

% sudo diskutil apfs addVolume disk1 ‘APFS’ nix

Will export new APFS Volume "nix" from APFS Container Reference disk1
Started APFS operation on disk1
Preparing to add APFS Volume to APFS Container disk1
Creating APFS Volume
Created new APFS Volume disk1s6
Mounting APFS Volume
Setting volume permissions
Disk from APFS operation: disk1s6
Finished APFS operation on disk1

After that, you should see a volume nix if you are running diskutil list.
The great thing is, that this volume does not need to have a fixed size. APFS shares the free disk spaces over all configured volumes!

1b (optional) encrypt disk

If you want to, you can also activate Disk Encryption for te new Disk. First you need to find out the name of your new Disk (if you did not note it from the previous command ;-)).

% diskutil list | grep nix

4:                APFS Volume nix                      7.7 GB    disk1s6

% sudo diskutil apfs encryptvolume disk1s6 -user disk

You need to enter a passphrase for the encryption. You have to remember that passphrase once – you can add it to your key chain later on.

Passphrase for the new "Disk" user (672C4CFF-34C6-4407-83ED-294C1C42E161):
Repeat passphrase:

After that the disk encryption will start in the background:

Starting background encryption with the new "Disk" crypto user on disk1s6
The new "Disk" user will be the only one who has initial access to disk1s6
The new APFS crypto user UUID will be 672C4CFF-34C6-4407-83ED-294C1C42E161
Background encryption is ongoing; see "diskutil apfs list" to see progress

2 setup Mount Point

MacOS Catalina does not allow to create folders directly under your Root Path /. But we can use another method to have MacOS create that folder for us. To do this, we have to add an entry into the file /etc/synthetic.conf:

% sudo bash -c “echo nix >> /etc/synthetic.conf”

Now, the next time, the system starts, a mount point /nix will be created. The next task is to have our Volume mounted at Boot.

3 setup Mount

For the Mount Configuration, we need to the UUID of the Volume. We can find this via the diskutil tool:

% diskutil info /dev/disk1s6 | grep UUID

Volume UUID:               1D9389C1-5676-4077-88F5-8D5304A0B1A6
Disk / Partition UUID:     1D9389C1-5676-4077-88F5-8D5304A0B1A6

In previoues version, you would just edit /etc/fstab and adding an entry there. But here is a clear info in that file to only edit it via vifs. The Tool vifs works like vi so an edit is quite easy.

% sudo vifs

We have to enter instert mode whith prssing the Key I.

After that, we can just paste this line into the editor window:

UUID=1D9389C1-5676-4077-88F5-8D5304A0B1A6 /nix apfs  rw

!! This UUID is only valid for my volume – your mileage may vary 

We now have to write our changes: press ESC to leave the insert mode, type :w + ENTER to save the changes and :q + ENTER to exit the editor.

4 Reboot

Before we can start our nix Setup, we have to reboot the system.

If you have enabled the disk encryption, you will be asked for the passphrase after the system has restarted. You need to enter it once and mark “add to key chain”. The next time, the disk should be mounted automatically.

5 Setup Nix

You can now proceed with the installation of Nix. Everything should work as expected. Since it is a realy Mount Point and no Softlink, there should be no errors expected.

% sh <(curl https://nixos.org/nix/install)

  % Total    % Received % Xferd  Average Speed   Time    Time     Time  Current
                                 Dload  Upload   Total   Spent    Left  Speed
100  2399  100  2399    0     0   9913      0 --:--:-- --:--:-- --:--:--  9995
downloading Nix 2.3.4 binary tarball for x86_64-darwin from 'https://nixos.org/releases/nix/nix-2.3.4/nix-2.3.4-x86_64-darwin.tar.xz' to '/var/folders/y3/29k7dx8s50l4y_l2tr78b_vh0000gn/T/nix-binary-tarball-unpack.XXXXXXXXXX.Fe7OlFzr'...
  % Total    % Received % Xferd  Average Speed   Time    Time     Time  Current
                                 Dload  Upload   Total   Spent    Left  Speed
100    87  100    87    0     0    878      0 --:--:-- --:--:-- --:--:--   878
100 26.6M  100 26.6M    0     0  11.3M      0  0:00:02  0:00:02 --:--:-- 12.0M
Note: a multi-user installation is possible. See https://nixos.org/nix/manual/#sect-multi-user-installation
performing a single-user installation of Nix...
copying Nix to /nix/store.............................................
installing 'nix-2.3.4'
building '/nix/store/96xp8q08cm412ibj8bhrgivx3hgc2gfx-user-environment.drv'...
created 7 symlinks in user environment
installing 'nss-cacert-3.49.2'
building '/nix/store/qjabndqd4kdjwlpiphwxrk84acy7x60k-user-environment.drv'...
created 9 symlinks in user environment
unpacking channels...
created 1 symlinks in user environment
modifying /Users/philipp/.bash_profile...

Installation finished!  To ensure that the necessary environment
variables are set, either log in again, or type

  . $HOME/.nix-profile/etc/profile.d/nix.sh

in your shell.

5b Hint

To have the nix commands in your path, you have to add the following to your  .zshrc file, since Catalina uses ZSH as the default shell:

  . $HOME/.nix-profile/etc/profile.d/nix.sh

Disk failure and suprises
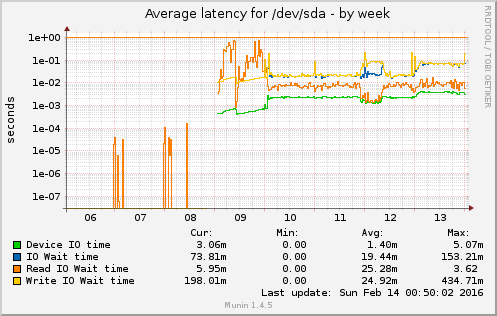
Flattr this!

Once in a while – and especially if you have a System with an uptime > 300d – HW tends to fail.

Good thing, if you have a Cluster, where you can do the maintance on one Node, while the import stuff is still running on the other ones. Also good to always have a Backup of the whole content, if a disk fails.

One word before I continue: Regarding Software-RAIDs: I had a big problem once with a HW RAID Controller going bonkers and spent a week to find another matching controller to get the data back. At least for redundant Servers it is okay for me to go with SW RAID (e.g. mdraid). And if you can, you should go with ZFS in any case :-).

Anyhow, if you see graphs like this one:

sda-week

You know that something goes terribly wrong.

Doing a quick check, states the obvious:

# cat /proc/mdstat
Personalities : [raid1]
md3 : active raid1 sda4[0](F) sdb4[1]
      1822442815 blocks super 1.2 [2/1] [_U]

md2 : active raid1 sda3[0](F) sdb3[1]
      1073740664 blocks super 1.2 [2/1] [_U]

md1 : active raid1 sda2[0](F) sdb2[1]
      524276 blocks super 1.2 [2/1] [_U]

md0 : active raid1 sda1[0](F) sdb1[1]
      33553336 blocks super 1.2 [2/1] [_U]

unused devices: <none>

So /dev/sda seems to be gone from the RAID. Let’s do the checks.

Hardware check

hdparm:

# hdparm -I /dev/sda

/dev/sda:
HDIO_DRIVE_CMD(identify) failed: Input/output error 

smartctl:

# smartctl -a /dev/sda
smartctl 5.41 2011-06-09 r3365 [x86_64-linux-2.6.32-34-pve] (local build)
Copyright (C) 2002-11 by Bruce Allen, http://smartmontools.sourceforge.net

Vendor:               /0:0:0:0
Product:
User Capacity:        600,332,565,813,390,450 bytes [600 PB]
Logical block size:   774843950 bytes
scsiModePageOffset: response length too short, resp_len=47 offset=50 bd_len=46
>> Terminate command early due to bad response to IEC mode page
A mandatory SMART command failed: exiting. To continue, add one or more '-T permissive' options.

/dev/sda is dead, Jim

Next thing is to schedule a Disk Replacement and moving all services to another host/prepare the host to shutdown for maintenance.

Preparation for disk replacement

Stop all running Containers:

# for VE in $(vzlist -Ha -o veid); do vzctl stop $VE; done

I also disabled the “start at boot” option to have a quick startup of the Proxmox Node.

Next: Remove the faulty disk from the md-RAID:

# mdadm /dev/md0 -r /dev/sda1
# mdadm /dev/md1 -r /dev/sda2
# mdadm /dev/md2 -r /dev/sda3
# mdadm /dev/md3 -r /dev/sda4

Shutting down the System.

… some guy in the DC moved to the server at the expected time and replaces the faulty disk …

After that, the system is online again.

  1. copy partition table from /dev/sdb to /dev/sda
    # sgdisk -R /dev/sda /dev/sdb
    
  2. recreate the GUID for /dev/sda
    # sgdisk -G /dev/sda
    

Then add /dev/sda to the RAID again.

# mdadm /dev/md0 -a /dev/sda1
# mdadm /dev/md1 -a /dev/sda2
# mdadm /dev/md2 -a /dev/sda3
# mdadm /dev/md3 -a /dev/sda4


# cat /proc/mdstat
Personalities : [raid1]
md3 : active raid1 sda4[2] sdb4[1]
      1822442815 blocks super 1.2 [2/1] [_U]
      [===>.................]  recovery = 16.5% (301676352/1822442815) finish=329.3min speed=76955K/sec

md2 : active raid1 sda3[2] sdb3[1]
      1073740664 blocks super 1.2 [2/2] [UU]

md1 : active raid1 sda2[2] sdb2[1]
      524276 blocks super 1.2 [2/1] [_U]
        resync=DELAYED

md0 : active raid1 sda1[2] sdb1[1]
      33553336 blocks super 1.2 [2/2] [UU]

unused devices: <none>

After nearly 12h, the resync was completed:

diskstats_iops-day

and then this happened:

# vzctl start 300
# vzctl enter 300
enter into CT 300 failed
Unable to open pty: No such file or directory

There are plenty of comments if you search for Unable to open pty: No such file or directory

But

# svzctl exec 300 /sbin/MAKEDEV tty
# vzctl exec 300 /sbin/MAKEDEV pty
# vzctl exec 300 mknod --mode=666 /dev/ptmx c 5 2

did not help:

# vzctl enter 300
enter into CT 300 failed
Unable to open pty: No such file or directory    

And

# strace -ff vzctl enter 300

produces a lot of garbage – meaning stacktraces that did not help to solve the problem.
Then we were finally able to enter the container:

# vzctl exec 300 mount -t devpts none /dev/pts

But having a look into the process list was quite devastating:

# vzctl exec 300 ps -A
  PID TTY          TIME CMD
    1 ?        00:00:00 init
    2 ?        00:00:00 kthreadd/300
    3 ?        00:00:00 khelper/300
  632 ?        00:00:00 ps    

That is not really what you expect when you have a look into the process list of a Mail-/Web-Server, isn’t it?
After looking araound into the system and searching through some configuration files, it became obvious, that there was a system update in the past, but someone forgot to install upstart. So that was easy, right?

# vzctl exec 300 apt-get install upstart
Reading package lists...
Building dependency tree...
Reading state information...
The following packages will be REMOVED:
  sysvinit
The following NEW packages will be installed:
  upstart
WARNING: The following essential packages will be removed.
This should NOT be done unless you know exactly what you are doing!
  sysvinit
0 upgraded, 1 newly installed, 1 to remove and 0 not upgraded.
Need to get 486 kB of archives.
After this operation, 851 kB of additional disk space will be used.
You are about to do something potentially harmful.
To continue type in the phrase 'Yes, do as I say!'
 ?] Yes, do as I say!

BUT:

Err http://ftp.debian.org/debian/ wheezy/main upstart amd64 1.6.1-1
  Could not resolve 'ftp.debian.org'
Failed to fetch http://ftp.debian.org/debian/pool/main/u/upstart/upstart_1.6.1-1_amd64.deb  Could not resolve     'ftp.debian.org'
E: Unable to fetch some archives, maybe run apt-get update or try with --fix-missing?

No Network – doooh.

So… that was that. Another plan to: chroot. Let’s start:
First we need to shutdown the container – or at least what is running of it:

# vzctl stop 300
Stopping container ...
Container is unmounted    

Second, we have to mount a bunch of devices to the FS:

# mount -o bind /dev /var/lib/vz/private/300/dev
# mount -o bind /dev/shm /var/lib/vz/private/300/dev/shm
# mount -o bind /proc /var/lib/vz/private/300/proc
# mount -o bind /sys /var/lib/vz/private/300/sys

Then perform the chroot and the installtion itself:

# chroot /var/lib/vz/private/300 /bin/bash -i

# apt-get install upstart
# exit      

At last, umount all the things:

# umount -l /var/lib/vz/private/300/sys
# umount -l /var/lib/vz/private/300/proc
# umount -l /var/lib/vz/private/300/dev/shm
# umount -l /var/lib/vz/private/300/dev

If you have trouble, because some of the devices are busy, kill the processes you find out with:

# lsof /var/lib/vz/private/300/dev

Or just clean the whole thing

# lsof 2> /dev/null | egrep '/var/lib/vz/private/300'    

Try to umount again :-).

Now restarting the container again.

# Starting container ...
# Container is mounted
# Adding IP address(es): 10.10.10.130
# Setting CPU units: 1000
# Setting CPUs: 2
# Container start in progress...  

And finally:

 # vzctl enter 300
 root@300 #  
 root@300 # ps -A | wc -l
 142

And this looks a lot better \o/.

Writing Munin Plugins pt3: some Stats about VMWare Fusion
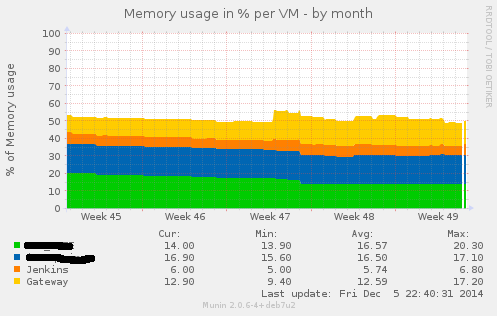
Flattr this!

In a project where we had the need for VMs being capable of doing CI for Java and also doing CI for iOS Application (using XCode Build Bots), we decided to go with a Mac OS Server as the Host Platform and using VMWare Fusion as the base Virtualisation System. We had several VMs there (Windows, Solaris, Linux and Mac OS). Doing a proper Monitoring for theses VMs was not that easy. We already had a working Munin Infrastructure, but no Plugin for displaying VMWare Fusion Stats existed.

The first approach was to use the included VMTools for gathering the information, since we already used them to start/stop/restart VMs via CLI/SSH:

#!/bin/bash

echo "starting VMS..."
VM_PATH=/Users/Shared/VMs
TOOL_PATH=/Applications/VMTools
$TOOL_PATH/vmrun -T fusion start $VM_PATH/Mac_OS_X_10.9.vmwarevm/Mac_OS_X_10.9.vmx nogui

or

#!/bin/bash

echo "starting VMS..."
VM_PATH=/Users/Shared/VMs
TOOL_PATH=/Applications/VMTools
$TOOL_PATH/vmrun -T fusion stop $VM_PATH/Mac_OS_X_10.9.vmwarevm/Mac_OS_X_10.9.vmx

But it was very hard to receive the interesting Data from the Log Files (statistica data is only really supported in VMWare ESXi). So we choose the direct way, to receive the live data, using ps. So this approach is also applicable for other Applications as well.

Our goal was to get at lease three Graphs (% of used CPU, % of used Memory and physically used Memory) sorted by VM Name.

ps -A | grep vmware-vmx

provides us with a list of all running vmware processes. Since we only need specific Data, we add some more filters:

ps -A -c -o pcpu,pmem,rss=,args,comm -r | grep vmware-vmx

29,4 14,0 2341436   J2EE.vmx                                                 vmware-vmx
1,7 12,9 2164200    macos109.vmx                                             vmware-vmx
1,4 17,0 2844044    windows.vmx                                              vmware-vmx
0,7  6,0 1002784    Jenkins.vmx                                              vmware-vmx
0,0  0,0    624     grep vmware-vmx      

where this is the description (man ps) of the used columns:

  • %cpu percentage CPU usage (alias pcpu)
  • %mem percentage memory usage (alias pmem)
  • rss the real memory (resident set) size of the process (in 1024 byte units).

You might see several things: First we have our data and the Name of each VM. Second, we have to get rid of the last line, since that is our grep process. Third, we might need to do some String Operations/Number Calculation to get some valid Data at the end.

Since Perl is a good choice if you need to do some String Operations, the Plugins is written in Perl :-).

Let’s have a look.
The Config Element is quite compact (e.g. for the physical mem):

my $cmd = "ps -A -c -o pcpu,pmem,rss=,args,comm -r | grep vmware-vmx";
my $output = `$cmd`;
my @lines=split(/\n/,$output);
...
if( $type eq "mem" ) {
    print $base_config;
    print "graph_args --base 1024 -r --lower-limit 0\n";    
    print "graph_title absolute Memory usage per VM\n";
    print "graph_vlabel Memory usage\n";
    print "graph_info The Graph shows the absolute Memory usage per VM\n";  
    foreach my $line(@lines) {
        if( $line  =~ /(?<!grep)$/ ) {  
            my @vm = ();
            my $count = 0;
            my @array=split(/ /,$line); 
            foreach my $entry(@array) {
                if( length($entry) > 2 ){
                    $vm[$count]=$entry;
                    $count++;
                }
            }
            $vm[3] = clean_vmname($vm[3]);  
            if( $vm[3] =~ /(?<!comm)$/) {           
                if( $lcount > 0 ){
                    print "$vm[3]_mem.draw STACK\n";
                } else {
                    print "$vm[3]_mem.draw AREA\n";
                }
                print "$vm[3]_mem.label $vm[3]\n";
                print "$vm[3]_mem.type GAUGE\n";            
                $lcount++;      
            }           
        }
    }                       
}

After the basic Setup (Category, Graph Type, Labels, etc. ) we go through each line of the output from the ps command, filtering the line containing grep.
We use the stacked Graph Method, so the first entry has to be the base Graph, the following ones will just be layer on top of the first. To get clean VM Names, we have a quite simple function clean_vmname:

sub clean_vmname {
    my $vm_name = $_[0];
    $vm_name =~ s/\.vmx//;
    $vm_name =~ s/\./\_/g;
    return $vm_name;
}

The Code, that delivers the Data looks similar. We just piping the values from the ps command to the output:

foreach my $line(@lines) {
    if( $line  =~ /(?<!grep)$/ ) {
        my @vm = ();
        my $count = 0;
        my @array=split(/ /,$line); 
        foreach my $entry(@array) {
            if( length($entry) > 2 ){
                $vm[$count]=$entry;
                $count++;
            }
        }
        $vm[3] = clean_vmname($vm[3]);
        if( $vm[3] =~ /(?<!comm)$/) {   
            if( $type eq "pcpu" ) {
                print "$vm[3]_pcpu.value $vm[0]\n";
            }
            if( $type eq "pmem" ) {
                print "$vm[3]_pmem.value $vm[1]\n";
            }
            if( $type eq "mem" ) {
                my $value =  ($vm[2]*1024);
                print "$vm[3]_mem.value $value\n";
            }
        }
    }
}   

You can find the whole plugin here on GitHub.

Here are some example Graphs you will get as a result:


fusion_mem-month fusion_pcpu-month fusion_pmem-month

Writing Munin Plugins pt1: Overview

Flattr this!

Writing your own Munin Plugins

Around February this year, we at innoQ had the need for setting up a Mac OS based CI for a Project. Besides building of integrating some standard Java Software, we also had to setup an Test Environment with Solaris/Weblogic, Mac OS for doing a CI for an iOS Application and a Linux System that contains the Jenkins CI itself.
Additionally the whole Setup should be reachable via VPN (also the iOS Application itself should be able to reach the Ressources via VPN).

To have the least possible obsticles in Setting up the iOS CI and the iOS (iPad) VPN Access, we decide to use Mac OS Server as the Basic Host OS. As the Need for Resources are somehow limited for the other Systems (Solaris/Weblogic, Linux/Jenkins), we also decide to do a basic VM Setup with VMWare Fusion.

Since we have a decent Munin Monitoring Setup in our Company for all our Systems, we need some Monitoring for all Services used in our Setup:

Beside the Standard Plugins (like Network/CPU/RAM/Disk) that was basically

  • Jenkins CI
  • VMware Fusion
  • VPN

After searching through the Munin Plugin Repository we couldn’t find any plugins providing the necessary monitoring. So the only choice was to write your own set of plugins. Since all three Plugins use different Approaches for collecting the Data, i plan two writer three different posts here. One for each Plugin. The Sources are availible online here and might be added to the main Munin Repo as soon as the Pull Requests are accepted.

How Munin works

But first a brief overview of Munin. Munin is a TCP based Service that has normally one Master and one Node for each System that needs to be monitored. The Master Node ask all Nodes periodicly for Monitoring Updates.
The Node Service, delivering the Updated Data runs on Port 4949 per default. To add some level of security, you normal add a IP to a whitelist, that is allowed to query the Nodes Data.

You can use normal telnet for accessing the Nodes Data:

telnet localhost 4949
Trying ::1...
telnet: connect to address ::1: Connection refused
Trying 127.0.0.1...
Connected to localhost.
Escape character is '^]'.
# munin node at amun

Every Node delivers Information about specific Services provided by Plugins. To get an overview about the configured plugins you do a:

# munin node at amun
list
df df_inode fusion_mem fusion_pcpu fusion_pmem if_en0 if_err_en0 load lpstat netstat ntp_offset processes users

A Plugin always provides a Configuration Output and a Data Output. By Default if you query a Plugin, you will always get the Data Output:

# munin node at amun
df
_dev_disk1s2.value 34
_dev_disk0s1.value 48
_dev_disk3s2.value 62
_dev_disk2s1.value 6
_dev_disk2s2.value 32

To trigger the Config Output you need to add a config to your command:

# munin node at amun
df config
graph_title Filesystem usage (in %)
graph_args --upper-limit 100 -l 0
graph_vlabel %
graph_scale no
_dev_disk0s1.label /Volumes/Untitled
_dev_disk1s2.label /
_dev_disk2s1.label /Volumes/System-reserviert
_dev_disk2s2.label /Volumes/Windows 7
_dev_disk3s2.label /Volumes/Data

You can also use the tool munin-run for doing a basic test (it will be installed when installing your munin-node Binary)

 munin-run df
_dev_disk1s2.value 34
_dev_disk0s1.value 48
_dev_disk3s2.value 62
_dev_disk2s1.value 6
_dev_disk2s2.value 32
munin-run df config
graph_title Filesystem usage (in %)
graph_args --upper-limit 100 -l 0
graph_vlabel %
graph_scale no
_dev_disk0s1.label /Volumes/Untitled
_dev_disk1s2.label /
_dev_disk2s1.label /Volumes/System-reserviert
_dev_disk2s2.label /Volumes/Windows 7
_dev_disk3s2.label /Volumes/Data

Summary

So a Plugin needs to provide an Output both modes:

  • Configuration Output when run with the config argument
  • The (normal) Data Output when called withouth additional arguments

Plugins are Shell Scripts that can be written in every Programming language that is supported by the Nodes Shell (e.g. Bash, Perl, Python, etc.)

Since it is one of the easier Plugins we will have a look at the Plugin, monitoring the VPN Connections at our Mac OS Server in the next Post.

sophisticated Backups mit Rsync Part II

Flattr this!

Version 3.1
Features:

  • Logs werden nun gzip komprimiert
  • wöchentliche Backups aus der vorherigen Woche werden tar.gz komprimiert


#!/bin/sh

# Philipp's backup-scripte version 3.1

ROOT=`pwd`
BACKDIR=$ROOT/backup

D=`eval date +%Y-%m-%d`
W=`eval date +%Y-%W`
w=`eval date +%w`
LATEST="latest"
EXCLUDE=$ROOT/exclude.txt
SOURCES=$ROOT/sources.txt

LOG=$ROOT/log/$D.log

# Array mit allen ben‚‚tigten Verzeichnissen und Ordnern
folders=( $ROOT/log )
files=( $EXCLUDE $SOURCES $LOG)

for folder in ${folders[@]}; do
    if [ ! -d $folder  ] ; then mkdir -p $folder; fi
done

for file in ${files[@]}; do
    if [ ! -f $file  ] ; then touch $file; fi
done

log () {
    if [  -z "$1" ] ; then echo "" > $LOG ; fi
    echo $1
    echo $1 >> $LOG    
}

# needs Hostname
gzipLastWeekly (){
    log "=================================================================="
    log "compress...";
    echo $1
    ROOT=`pwd`
    L_BACKDIR="$ROOT/backup/$1/weekly"; 
    if [ -d $L_BACKDIR ] ; then    
        NUM=${#L_BACKDIR}+1;
        L_LATEST=`ls -al $L_BACKDIR/latest`
        L_FOLDER="${L_LATEST#*-> }";
        L_FILE="${L_LATEST#*-> }";
        L_FILENAME="${L_FILE:$NUM:7}";
        log "L_BACKDIR $L_BACKDIR";
        #log "L_LATEST $L_LATEST";
        log "L_FOLDER $L_FOLDER";
        log "L_FILE $L_FILE";
        log "L_FILENAME $L_FILENAME";
        log "=================================================================="          
        if [ -d $L_FOLDER ] ; then
            if [ $L_FILENAME != "$W" ]; then
                log "compress  $L_FOLDER";
                cd $L_BACKDIR
                tar -cvf - $L_FILENAME/ | gzip > $L_FILENAME.tar.gz  | tee -a $LOG
                cd $ROOT
                rm -R $L_FOLDER
                log "MD5: "
                log "=================================================================="
                md5 $L_BACKDIR/$L_FILENAME.gz -out $LOG;
                log "=================================================================="
            fi
        fi    
    fi
    log "...done";
    log "==================================================================" 
}

# Ab hier gehts dann richtig los :-)

log

log "STARTING BACKUP..."
log "date: $D"

#stopping start time
#TIME0= expr `date +%s`;

# backup following sources
for SOURCE in `cat $SOURCES`; do
    log ""
    log "=================================================================="
    log "====== backup: $SOURCE "
    if [ ! -d $BACKDIR/$SOURCE/daily/$D  ] ; then mkdir -p $BACKDIR/$SOURCE/daily/$D; fi    
    if [ ! -f $BACKDIR/$SOURCE/src-root.txt  ] ; then touch $BACKDIR/$SOURCE/src-root.txt; fi    
    if [ ! -f $BACKDIR/$SOURCE/src-folders.txt  ] ; then touch $BACKDIR/$SOURCE/src-folders.txt; fi      
    #Logindaten lesen
    LOGINDATA=`cat $BACKDIR/$SOURCE/src-root.txt`
    if [ ! "$LOGINDATA" = "" ]; then
        log "====== benutze $LOGINDATA" 
        log "=================================================================="
        log ""
        for FOLDER in `cat $BACKDIR/$SOURCE/src-folders.txt`; do
            log "backup up... $FOLDER"
            mkdir -p $BACKDIR/$SOURCE/daily/$D/$FOLDER
            ### wenn schon latest-day vorhanden, dann sichere nur ‚nderungen
            if [ -d $BACKDIR/$SOURCE/daily/$LATEST  ] ; then 
		        log "using latest: $BACKDIR/$SOURCE/daily/$LATEST"
                rsync -zrva $OLD --exclude-from=$EXCLUDE --link-dest=$BACKDIR/$SOURCE/daily/$LATEST/$FOLDER  $LOGINDATA/$FOLDER/ $BACKDIR/$SOURCE/daily/$D/$FOLDER | tee -a $LOG
            else
                rsync -zrva $OLD --exclude-from=$EXCLUDE $LOGINDATA/$FOLDER/ $BACKDIR/$SOURCE/daily/$D/$FOLDER | tee -a $LOG
            fi   	
        done

        ### setze latest von altem Stand auf aktuelles Backup
        if [ -d $BACKDIR/$SOURCE/daily/$D ] ; then
            log "Daily: deleting ln last daily latest: $BACKDIR/$SOURCE/daily/$LATEST"
            if [ -d $BACKDIR/$SOURCE/daily/$LATEST ] ; then rm $BACKDIR/$SOURCE/daily/$LATEST; fi
            log "Daily: updating ln daily latest: $BACKDIR/$SOURCE/daily/$LATEST"
            ln -s $BACKDIR/$SOURCE/daily/$D $BACKDIR/$SOURCE/daily/$LATEST | tee -a $LOG     
            log "Daily: deleting ln last daily latest: $BACKDIR/$SOURCE/$LATEST"
            if [ -d $BACKDIR/$SOURCE/$LATEST ] ; then rm $BACKDIR/$SOURCE/$LATEST; fi
            log "Daily: updating ln daily latest: $BACKDIR/$SOURCE//$LATEST"
            ln -s $BACKDIR/$SOURCE/daily/$D $BACKDIR/$SOURCE/$LATEST | tee -a $LOG     
        fi

        ### setze latest-global von altem Stand auf aktuelles Backup
        log "Daily: deleting ln last global latest: $BACKDIR/$SOURCE/$LATEST"
        if [ -d $BACKDIR/$SOURCE/$LATEST ] ; then 
            rm $BACKDIR/$SOURCE/$LATEST;
        fi            
        log "Daily: updating ln global latest"
        ln -s $BACKDIR/$SOURCE/daily/$D $BACKDIR/$SOURCE/$LATEST | tee -a $LOG 

        ## wenn ende der Woche, dann erstelle Snapshot der Woche
        if [ "$w" = "0" ]; then
            log "Weekly: create week-backup for $W"
            for FOLDER in `cat $BACKDIR/$SOURCE/src-folders.txt`; do
                mkdir -p $BACKDIR/$SOURCE/weekly/$W/$FOLDER
                rsync -zrva $OLD --exclude-from=$EXCLUDE $BACKDIR/$SOURCE/daily/$D/$FOLDER/ $BACKDIR/$SOURCE/weekly/$W/$FOLDER | tee -a $LOG
            done

            ### komprimiere letztes week Backup
            log "==================================================================" 
            log "Weekly: compressing last weekly latest"
            gzipLastWeekly $SOURCE

            ### setze latest-day von altem Stand auf aktuelles Backup
            log "Weekly: deleting ln last daily latest: $BACKDIR/$SOURCE/daily/$LATEST"
            if [ -d $BACKDIR/$SOURCE/daily/$LATEST ] ; then 
                rm $BACKDIR/$SOURCE/daily/$LATEST;
            fi

            ### loesche alte Backups
            log "Weekly: delete all daily folders"
            rm -R $BACKDIR/$SOURCE/daily/*

            log "Weekly: updating ln daily latest: $BACKDIR/$SOURCE/daily/$LATEST"
            ln -s $BACKDIR/$SOURCE/weekly/$W $BACKDIR/$SOURCE/daily/$LATEST | tee -a $LOG            

            ### setze latest-week von altem Stand auf aktuelles Backup
            log "Weekly: deleting ln last weekly latest: $BACKDIR/$SOURCE/weekly/$LATEST"
            if [ -d $BACKDIR/$SOURCE/weekly/$LATEST ] ; then 
                rm $BACKDIR/$SOURCE/weekly/$LATEST;
            fi

            log "Weekly: updating ln weekly latest"
            ln -s $BACKDIR/$SOURCE/weekly/$W $BACKDIR/$SOURCE/weekly/$LATEST | tee -a $LOG 

            ### setze latest-global von altem Stand auf aktuelles Backup
            log "Weekly: deleting ln last global latest: $BACKDIR/$SOURCE/$LATEST"
            if [ -d $BACKDIR/$SOURCE/$LATEST ] ; then 
                rm $BACKDIR/$SOURCE/$LATEST;
            fi            
            log "Weekly: updating ln global latest"
            ln -s $BACKDIR/$SOURCE/weekly/$W $BACKDIR/$SOURCE/$LATEST | tee -a $LOG 
        fi
    fi
done

#stopping end time
#TIME1= expr `date +%s`;
#ERG = expr `$TIME1 - $TIME0`;

log "=================================================================="
log "DONE"
#log "using $ERG seconds"
log "=================================================================="

gzip $LOG -f


instant jruby & derby environment für eine RoR Anwendung

Flattr this!

Als angestammter Java-Entwickler geht es mir oftmals schwer von der Hand, einer Ruby on Rails (RoR) Anwendung mit relativ wenig Aufwand eine brauchbare Laufzeitumgebung zu bieten.
Normalerweise sollte das OS (MacOS 10.5.6) alles Brauchbare bieten. So ist oftmals eine Rails-Version installiert und auch das (standardmäßig genutzte) SQlite 3 ist vorhanden.
Dennoch sind es oftmals Plugins (spezielle Rails Version / spezielle gems), welche einen zusätzlichen Aufwand benötigen.
Nicht zu vergessen, dass RoR nicht auf allen Systemen vorinstalliert ist und dementsprechend ein interessierter Entwicklung von einem Out-of-the-Box Erlebnis weit entfernt ist.
Sehen wir den Tatsachen ins Auge… die Wahrscheinlichkeit eine installierte JVM vorzufinden ist (noch?) deutlich höher, als eine Lauffähige Ruby-Installation.
Was liegt also näher, als die benötigte Umgebung auf Java fußen zu lassen.
Hierzu werden verwendet:

  • jRuby in Version 1.1.5 (http://jruby.codehaus.org)
  • Derby-DB in Version 10.4.2.0 (http://db.apache.org/derby)
  • weiterhin wird eine installierte JVM (>1.5) vorrausgesetzt


Alles weitere wird mit Hilfe von shell-Scripten bewerkstelligt. Wobei momentan nur Unix-Scripte benutzt werden. Eine Portierung auf Windows sollte aber nur eine Sache von Minuten sein.
Es liegt eine RoR-Anwendung in einem Entwicklungs-Status vor. Diese wurde bisher in einem Netbeans-Enviroment mit einer SQlite-DB betrieben.
Das Verzeichnis ist folgendermaßen aufgebaut:

ROOT
|
|- microblog (dies ist unsere RoR-Anwendung)
|
|- derby (derby-installtion - es werden jeweils das bin und lib Verzeichnis benötigt)
| |-bin
| |-lib
|
|- jruby (jruby-installtion - es werden jeweils das bin und lib Verzeichnis benötigt)
| |-bin
| |-lib

Das Hauptproblem besteht darin, dass alle benötigten gems in das entsprechende Unterverzeichnis installiert werden müssen.
Weiterhin muss die Derby-DB mit dem entsprechenden Rake-Task auf mit der aktuellen Schema-Datei instanziiert werden.
Zuletzt sollen die vorhandenen User-Daten in die Derby-DB eingefügt werden.

  1. Anpassen der database.yml
    Wir nutzen weiterhin eine jdbc-Connection. Allerdings ändert sich der Treiber auf den der Derby-DB:
    database.yml

    development:
    adapter: jdbc
    driver: org.apache.derby.jdbc.ClientDriver
    url: jdbc:derby://localhost/microblog_development;create=true
    encoding: utf8
    pool: 5
    username: microblog
    password: microblog
    host: localhost
  2. Export der alten DB-Daten:
    Wir benutzen hierzu das Tool sqlitebrowser (http://sqlitebrowser.sourceforge.net) und erzeugen uns so einen SQL-Dump der alten SQLite-DB. Wir benutzen hierbei nur die SQL-Inserts für den User-Import. Diese speichern wir in die Datei:
    microblog/db/microblog.sql
  3. Für den Import erstellen wir einen Rake-Task:
    microblog/lib/tasks/sql-import.rake

    namespace :microblog do
    desc 'Import old SQL Data'
    task :sqlimport => :environment do
    dbConn = ActiveRecord::Base.establish_connection :development
    sql = File.open("db/microblog.sql").read
    sql.split(';').each do |sql_statement|
    dbConn.connection.execute(sql_statement)
    end
    puts "imported user data '#{Time.now}' "
    end
    end
  4. Erstellen des Setup-Scriptes:
    Folgende Schritte sind notwendig:

    1. Setzen aller benötiger Verzeichnisse
    2. installieren aller benötigter gems
    3. Starten des Derby-DB-Servers
    4. Rake db:migrate
    5. import der alten Daten
    6. Beenden des Derby-DB-Servers

    Das Script sieht wie folgt aus:
    jruby-setup.sh

    #!/bin/sh
    BASE_DIR=`pwd`
    CP=".:$BASE_DIR/jruby/lib/*:$BASE_DIR/derby/lib/derbyclient.jar"
    JAVA_OPTS="-Djdbc.drivers=org.apache.derby.jdbc.EmbeddedDriver"
    JRUBY="$BASE_DIR/jruby/bin/jruby"
    DERBY_HOME=`cd derby && pwd`
    export DERBY_HOME=$DERBY_HOME
    cd $BASE_DIR
    echo "setting up jgems..."
    $BASE_DIR/jruby/bin/jruby $BASE_DIR/jruby/bin/jgem update --system
    $BASE_DIR/jruby/bin/jruby $BASE_DIR/jruby/bin/jgem install jruby-openssl --no-rdoc --no-ri
    $BASE_DIR/jruby/bin/jruby $BASE_DIR/jruby/bin/jgem install -v=2.2.2 rails --no-rdoc --no-ri
    $BASE_DIR/jruby/bin/jruby $BASE_DIR/jruby/bin/jgem install activerecord-jdbc-adapter activerecord-jdbcderby-adapter --no-rdoc --no-ri
    echo "starting derby..."
    $BASE_DIR/derby/bin/startNetworkServer &
    echo "setting up derby..."
    cd microblog
    $BASE_DIR/jruby/bin/jruby $BASE_DIR/jruby/bin/rake db:migrate
    $BASE_DIR/jruby/bin/jruby $BASE_DIR/jruby/bin/rake microblog:sqlimport
    cd $BASE_DIR
    echo "stopping derby..."
    $BASE_DIR/derby/bin/stopNetworkServer &

    Es ist zu erwähnen, dass es notwendig ist, jeweils auf die entsprechende jRuby-Installation zu verweisen.
    Weiterhin benötigt jRuby den entsprechenden derbyClientDriver, welcher in die (von jRuby später verwendete) JAVA_OPTS-Variabel eingetragen wird.
    Ebenfalls musst der Classpath soweit angepasst werden, dass sowohl jRuby, als auch Derby über die notwendigen Bibliotheken verfügen.
    Als letztes ist noch erwähnenswert, dass die beiden Rake-Tasks jeweils aus dem App-Verzeichnis ausgeführt werden.

  5. Das Start-Script.
    Letzendlich sind auch zum eigentlichen Betrieb des Servers Anpassungen notwendig, da auch hier die jRuby-Instanz mit den verwendeten gems benutzt werden sollen.
    Das Script sieht wie folgt aus:
    run.sh

    #!/bin/sh
    BASE_DIR=`pwd`
    CP=".:$BASE_DIR/jruby/lib/*:$BASE_DIR/derby/lib/derbyclient.jar"
    JAVA_OPTS="-Djdbc.drivers=org.apache.derby.jdbc.EmbeddedDriver"
    JRUBY="$BASE_DIR/jruby/bin/jruby"
    export BASE_DIR=$BASE_DIR
    export JRUBY=$JRUBY
    DERBY_HOME=`cd derby && pwd`
    export DERBY_HOME=$DERBY_HOME
    cd $BASE_DIR
    echo "starting derby..."
    $BASE_DIR/derby/bin/startNetworkServer &
    echo "setting up derby..."
    cd microblog
    $BASE_DIR/jruby/bin/jruby $BASE_DIR/jruby/bin/rake db:migrate
    echo "starting microblog"
    $BASE_DIR/jruby/bin/jruby $BASE_DIR/microblog/script/server
    echo "stopping derby..."
    $BASE_DIR/derby/bin/stopNetworkServer &

    Es entspricht also einer abgespeckten Variante des Setup-Scriptes. Hierbei wird auch immer ein db:migrate aufgerufen, für den Fall, dass sich die DB-Struktur in der Zwischenzeit geändert haben sollte.

  6. Auslieferung ;-).
    Derby und jRuby belegen knapp 80 MB sodass es notwendig ist, die Dateigröße für den Transport zu verringern.
    Zuallererst sollten die benötigten gems am besten immer online bezogen werden, sodass man hier ein paar MB sparen kann.
    Weiterhin benutzen wir Jar um die vorhandenen Dateien auf ein 13 MB-Archiv zu packen.
    Die veränderten Scripte sehen wie folgt aus:
    Zuerst das Script, welches die vorhandenen Dateien packt:
    pack.sh

    #!/bin/sh
    find . -name '*.DS_Store' -type f -delete
    jar -cvf statusQ-runtime.jar derby/ jruby/ run.sh pack.sh microblog/db/microblog.sql microblog/lib/tasks/sql-import.rake
    rm -R jruby
    rm -R derby
    rm run.sh
    rm microblog/db/microblog.sql
    rm microblog/lib/tasks/sql-import.rake
    rm pack.sh

    Und nun das geänderte jruby-setup.sh Script, welches vor dem eigentlichen Setup noch für das Entpacken aller Dateien verantwortlich ist:
    jruby-setup.sh

    #!/bin/sh
    jar -xvf statusQ-runtime.jar
    rm -R META-INF
    chmod +x run.sh
    chmod +x setup.sh
    chmod +x pack.sh
    chmod +x jruby/bin/jruby
    chmod +x derby/bin/startNetworkServer
    chmod +x derby/bin/stopNetworkServer
    BASE_DIR=`pwd`
    CP=".:$BASE_DIR/jruby/lib/*:$BASE_DIR/derby/lib/derbyclient.jar"
    JAVA_OPTS="-Djdbc.drivers=org.apache.derby.jdbc.EmbeddedDriver"
    JRUBY="$BASE_DIR/jruby/bin/jruby"
    DERBY_HOME=`cd derby && pwd`
    export DERBY_HOME=$DERBY_HOME
    cd $BASE_DIR
    echo "setting up jgems..."
    $BASE_DIR/jruby/bin/jruby $BASE_DIR/jruby/bin/jgem update --system
    $BASE_DIR/jruby/bin/jruby $BASE_DIR/jruby/bin/jgem install jruby-openssl --no-rdoc --no-ri
    $BASE_DIR/jruby/bin/jruby $BASE_DIR/jruby/bin/jgem install -v=2.2.2 rails --no-rdoc --no-ri
    $BASE_DIR/jruby/bin/jruby $BASE_DIR/jruby/bin/jgem install activerecord-jdbc-adapter activerecord-jdbcderby-adapter --no-rdoc --no-ri
    echo "starting derby..."
    $BASE_DIR/derby/bin/startNetworkServer &
    echo "setting up derby..."
    cd microblog
    $BASE_DIR/jruby/bin/jruby $BASE_DIR/jruby/bin/rake db:migrate
    $BASE_DIR/jruby/bin/jruby $BASE_DIR/jruby/bin/rake microblog:sqlimport
    cd $BASE_DIR
    echo "stopping derby..."
    $BASE_DIR/derby/bin/stopNetworkServer &

Als nächstes sollte die Scripte auf Windows portiert werden.
Weiterhin wäre es interessant, die Derby/jRuby Binaries jeweils direkt online zu beziehen.

sophisticated Backups mit Rsync

Flattr this!

Backups sind wichtig.
Jeder der einmal vor einer kaputten, ratternden Festplatte gesessen hat, weiß wie frustrierend das Wissen ist, alle seine Daten ins informationstechnische Nirwana entschwinden zu sehen.
Ist ein Backup der persönlichen Daten noch mit relativ geringem Aufwand möglich (so es denn regelmäßig veranstaltet wird), so wird ein Backup eines Server-Systems in vielen Dingen anspruchsvoller.
Dies fängt damit an, dass reinen Datenmengen oftmals das Vielfache eines Ein-Benutzer-Systems betragen. Okay in heutige Zeit, wo ein jeder zig GBs an Musik und Videos auf dem Rechner hat, muss man das natürlich relativieren.
In diesem Beitrag möchte ich ein Bash-Script vorstellen, welches folgende Dinge leistet:

  1. Sichern von N-Hosts über RSYNC
  2. Sichern von N-Verzeichnissen auf jedem Host
  3. Inkrementelles Sichern (es werden nur Unterschiede gesichert/übertragen)
  4. Zusammenführen von täglichen (inkrementellen) Backups zu wöchentlichen Vollbackups.
  5. die aktuellen Backups sind jeweils unter einem Hardlink “latest” erreichbar.

Nachfolgend erfolgt eine Beschreibung über den Ablauf des Scriptes.
Es wird Momentan durch eine Sicherung von 3 Serversystemen und ca. 20 GB an reinen Nutzdaten getestet.

  1. Stelle sicher, dass alle notwendigen Verzeichnisse vorhanden sind:
    • Verzeichnis “log” für log-Dateien der Sicherungen
    • Verzeichnis “backup” für die eigentlichen Sicherungen
    • Je Backupquelle ein Verzeichnis
    • Innerhalb jedes Quellverzeichnisses ein Verzeichnis für tägliche und eines für wöchentliche Sicherungen
  2. Stelle sicher, dass alle Config-Dateien vorhanden sind:
    • sources.txt mit den Namen der zu sichernden Hosts/Verzeichnisse
    • exclude.txt mit den Dateien, welche nicht gesichert werden sollten (z.B. Thumbs.db)
    • innerhalb jedes Quellverzeichnisses eine Datei namens src-root.txt (mit dem ROOT der Sicherung)
      und src-folders.txt (mit den einzelnen Verzeichnissen)

Der Aufbau des Root-Verzeichnisses sieht nun wie folgt aus.

ROOT
|
|-log
|-sources.txt
|-exclude.txt
|-backup
|-host1.de
|-host2.de
|-src-root.txt
|-src-folders.txt
|-daily
|-weekly

Ein Beispiel für eine sources.txt sieht wie folgt aus:

host1.de
host2.de

Ein Beispiel für eine exclude.txt sieht wie folgt aus:

Thumbs.db
.DS_Store

Eine src-root.txt könnte so aussehen:

user@host1.de:

Eine src-folders.txt könnte so aussehen:

/home
/etc
/var/log
/var/www

Ablauf der Sicherung:

  • Generiere Log-Datei.
  • Iteriere über alle Quellen aus sources.txt
  • Überprüfe ob alle Quellen Verzeichnisse zum Sichern enthalten.
  • Überprüfe ob lokal Verzeichnisse für die Sicherung existieren – wenn nicht lege sie an.
  • Erstelle tägliches Backup – existiert ein vorheriges Backup, so sichere nur die Änderungen.

Dies passiert mit folgendem Befehl:

rsync -zrva –exclude-from=exclude.txt –link-dest=<hardlink-zu-altem-backup>  <sourcefolder>/ <backupfolder>/daily/<tag>/<zu-sicherndes-Verzeichnis>
Hierbei werden alle Benutzerrechte mitgesichert.
Setzte Hardlink vom letztem täglichen Backup auf aktuelles tägliches Backup.
Überprüfe ob Sonntag ist ( date +%w = 0)
Wenn ja, synchronisiere letztes tägliches Backup mit wöchentlichem (neuen) Backup.
Setzte Hardlink vom letztem wöchentlichen Backup auf aktuelles wöchentliches Backup.
Lösche alle täglichen Backups.
Setzte Hardlink vom letztem täglichen Backup auf aktuelles wöchentliches Backup.
So werden maximal 7 tägliche inkrementelle Backups erstellt und pro Jahr 52 wöchentliche Full-Backups.

#!/bin/sh

# Philipp's backup-scripte version 2

ROOT=/tank/backup/server
BACKDIR=$ROOT/backup
D=`eval date +%Y-%m-%d`
W=`eval date +%Y-%W`
w=`eval date +%w`
LATEST=latest
EXCLUDE=$ROOT/exclude.txt
SOURCES=$ROOT/sources.txt

LOG=$ROOT/log/$D.log

# Array of all needed folders
folders=( $ROOT/log $ROOT/sources )
files=( $EXCLUDE $SOURCES $LOG)

for folder in ${folders[@]}; do
    if [ ! -d $folder  ] ; then mkdir -p $folder; fi
done

for file in ${files[@]}; do
    if [ ! -f $file  ] ; then touch $file; fi
done

log () {
    if [  -z "$1" ] ; then echo "" > $LOG ; fi
    echo $1
    echo $1 >> $LOG    
}

# Ab hier gehts dann richtig los :-)

log

log "STARTING BACKUP..."
log "date: $D"

#stopping start time
#TIME0= expr `date +%s`;

# backup following sources
for SOURCE in `cat $SOURCES`; do
    log ""
    log "=================================================================="
    log "====== backup: $SOURCE "
    if [ ! -d $BACKDIR/$SOURCE/daily/$D  ] ; then mkdir -p $BACKDIR/$SOURCE/daily/$D; fi    
    if [ ! -f $BACKDIR/$SOURCE/src-root.txt  ] ; then touch $BACKDIR/$SOURCE/src-root.txt; fi    
    if [ ! -f $BACKDIR/$SOURCE/src-folders.txt  ] ; then touch $BACKDIR/$SOURCE/src-folders.txt; fi      
    #Logindaten lesen
    LOGINDATA=`cat $BACKDIR/$SOURCE/src-root.txt`
    if [ ! "$LOGINDATA" = "" ]; then
        log "====== benutze $LOGINDATA" 
        log "=================================================================="
        log ""
        for FOLDER in `cat $BACKDIR/$SOURCE/src-folders.txt`; do
            log "backup up... $FOLDER"
            mkdir -p $BACKDIR/$SOURCE/daily/$D/$FOLDER
            ### wenn schon latest-day vorhanden, dann sichere nur ânderungen
            if [ ! -d $BACKDIR/$SOURCE/daily/$LATEST  ] ; then 
                rsync -zrva $OLD --exclude-from=$EXCLUDE --link-dest=$BACKDIR/$SOURCE/daily/$LATEST/$FOLDER  $LOGINDATA/$FOLDER/ $BACKDIR/$SOURCE/daily/$D/$FOLDER | tee -a $LOG
            else
                rsync -zrva $OLD --exclude-from=$EXCLUDE $LOGINDATA/$FOLDER/ $BACKDIR/$SOURCE/daily/$D/$FOLDER | tee -a $LOG
            fi   
        done
        ### setze latest-day von altem Stand auf aktuelles Backup
        if [ -d $BACKDIR/$SOURCE/daily/$D ] ; then
            if [ -d $BACKDIR/$SOURCE/daily/$LATEST ] ; then rm $BACKDIR/$SOURCE/daily/$LATEST; fi
            ln -s $BACKDIR/$SOURCE/daily/$D $BACKDIR/$SOURCE/daily/$LATEST    
        fi

        ## wenn ende der Woche, dann erstelle Snapshot der Woche
        if [ "$w" = "0" ]; then
            log "create week-backup for $W"
            for FOLDER in `cat $BACKDIR/$SOURCE/src-folders.txt`; do
                mkdir -p $BACKDIR/$SOURCE/weekly/$W/$FOLDER
                rsync -zrva $OLD --exclude-from=$EXCLUDE $BACKDIR/$SOURCE/daily/$D/$FOLDER/ $BACKDIR/$SOURCE/weekly/$W/$FOLDER | tee -a $LOG
            done
            ### setze latest-week von altem Stand auf aktuelles Backup
            if [ -d $BACKDIR/$SOURCE/weekly/$LATEST ] ; then rm $BACKDIR/$SOURCE/weekly/$LATEST; fi
            ln -s $BACKDIR/$SOURCE/weekly/$W $BACKDIR/$SOURCE/weekly/$LATEST | tee -a $LOG 
            log "updating weekly latest"

            ### lââsche alte Backups
            log "delete all daily folders"
            rm -R $BACKDIR/$SOURCE/daily/*

            ### setze latest-day von altem Stand auf aktuelles Backup
            if [ -d $BACKDIR/$SOURCE/daily/$LATEST ] ; then rm $BACKDIR/$SOURCE/daily/$LATEST; fi
            ln -s $BACKDIR/$SOURCE/weekly/$W $BACKDIR/$SOURCE/daily/$LATEST | tee -a $LOG
            log "updating daily latest"
        fi
    fi
done

#stopping end time
#TIME1= expr `date +%s`;
#ERG = expr `$TIME1 - $TIME0`;

log "=================================================================="
log "DONE"
#log "using $ERG seconds"
log "=================================================================="