Fixing Issues after upgrading Proxmox 7 to 8
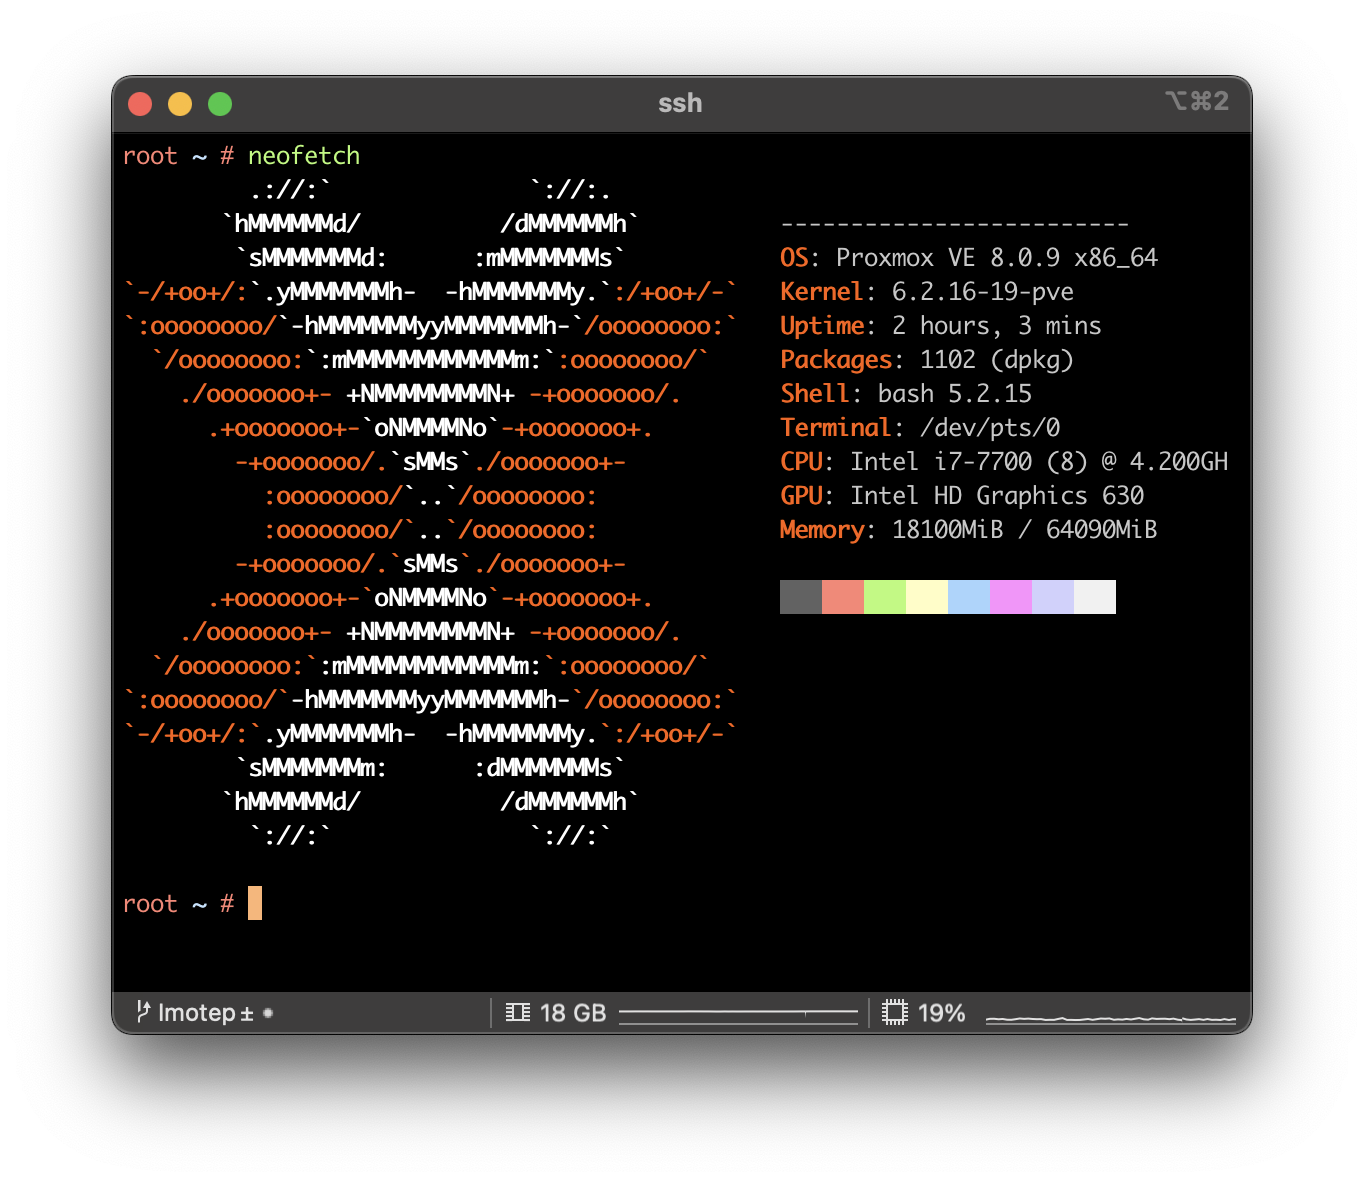
Flattr this!

My initial plan was to update all of my Proxmox nodes to the latest version by the end of this year. While most updates proceeded smoothly, I encountered two errors on one particular node.
Given that updating servers is a critical operation, especially when they are only remotely accessible via the network, I decided to document these errors and their solutions for future reference.

Proxmox Host does not come online again, after the reboot due to an update

The first issue arose after the mandatory reboot; the server failed to restart. Upon requesting a remote console connection, the boot process stalled with the following error message:

Boot stuck on “A start job is running for Network initialization (XXm / no limit)”

After consulting various posts on the Proxmox forum, I initially suspected a need to update my network configuration. However, my attempts proved unsuccessful, leading to multiple reboots into rescue mode.

Fortunately, I had the insight to consult the official “Proxmox upgrade 7 to 8” guide, where I ultimately discovered the solution to my issue:

Network Setup Hangs on Boot Due to NTPsec Hook

It appears that a bug may lead to the simultaneous installation of both ntpsec and ntpsec-ntpdate. This, in turn, causes the network to fail during boot, resulting in a hang.

The resolution involves disabling the ntpsec-ntpdate start script using the command chmod -x /etc/network/if-up.d/ntpsec-ntpdate and then rebooting, successfully resolving the issue.”

A container does not start and shows the error

The next issues happens with some containers, that don’t want to startup anymore.
The Proxmox UI displays the following error:

run_buffer: 322 Script exited with status 255  
lxc_init: 844 Failed to run lxc.hook.pre-start for container "105"  
__lxc_start: 2027 Failed to initialize container "105"  
TASK ERROR: startup for container '105' failed

After I started the container manually via the terminal, I got a more specific error:

root /etc/pve/lxc # lxc-start -n 105

lxc-start: 105: ../src/lxc/lxccontainer.c: wait_on_daemonized_start: 870 No such file or directory - Failed to receive the container state

lxc-start: 105: ../src/lxc/tools/lxc_start.c: main: 306 The container failed to start

lxc-start: 105: ../src/lxc/tools/lxc_start.c: main: 309 To get more details, run the container in foreground mode

lxc-start: 105: ../src/lxc/tools/lxc_start.c: main: 311 Additional information can be obtained by setting the --logfile and --logpriority options

root /etc/pve/lxc # lxc-start -n 105 -F

lxc-start: 105: ../src/lxc/conf.c: run_buffer: 322 Script exited with status 255

lxc-start: 105: ../src/lxc/start.c: lxc_init: 844 Failed to run lxc.hook.pre-start for container "105"

lxc-start: 105: ../src/lxc/start.c: __lxc_start: 2027 Failed to initialize container "105"

lxc-start: 105: ../src/lxc/conf.c: run_buffer: 322 Script exited with status 1

lxc-start: 105: ../src/lxc/start.c: lxc_end: 985 Failed to run lxc.hook.post-stop for container "105"

lxc-start: 105: ../src/lxc/tools/lxc_start.c: main: 306 The container failed to start

lxc-start: 105: ../src/lxc/tools/lxc_start.c: main: 311 Additional information can be obtained by setting the --logfile and --logpriority options

Trying to mount the container disk also produces some more errors:

root /etc/pve/lxc # pct mount 105

mount: /var/lib/lxc/105/rootfs: wrong fs type, bad option, bad superblock on /dev/loop17, missing codepage or helper program, or other error.
       dmesg(1) may have more information after failed mount system call.
mounting container failed
command 'mount -o noacl /dev/loop17 /var/lib/lxc/105/rootfs//' failed: exit code 32

So I initially though, that the filesystem might be corrupt, so I also did try to check it:

root /etc/pve/lxc # pct fsck 105

fsck from util-linux 2.38.1
/var/lib/vz/images/105/vm-105-disk-1.raw: clean, 373288/4194304 files, 8047185/16777216 blocks

[  713.133949] loop17: detected capacity change from 0 to 134217728
[  713.137988] ext4: Unknown parameter 'noacl'

The last info provided me with the right clue:
It seems, that with proxmox 8, that container config did change slightly. Re-setting the Disk ACL to default did eventually work.


After that, the container was able to startup again

Disk failure and suprises
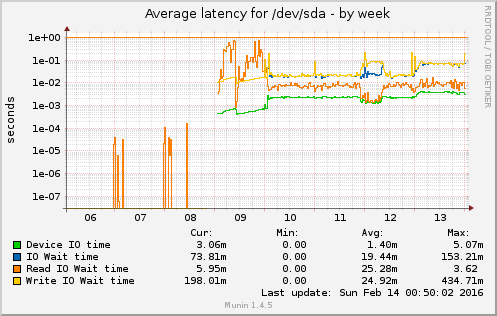
Flattr this!

Once in a while – and especially if you have a System with an uptime > 300d – HW tends to fail.

Good thing, if you have a Cluster, where you can do the maintance on one Node, while the import stuff is still running on the other ones. Also good to always have a Backup of the whole content, if a disk fails.

One word before I continue: Regarding Software-RAIDs: I had a big problem once with a HW RAID Controller going bonkers and spent a week to find another matching controller to get the data back. At least for redundant Servers it is okay for me to go with SW RAID (e.g. mdraid). And if you can, you should go with ZFS in any case :-).

Anyhow, if you see graphs like this one:

sda-week

You know that something goes terribly wrong.

Doing a quick check, states the obvious:

# cat /proc/mdstat
Personalities : [raid1]
md3 : active raid1 sda4[0](F) sdb4[1]
      1822442815 blocks super 1.2 [2/1] [_U]

md2 : active raid1 sda3[0](F) sdb3[1]
      1073740664 blocks super 1.2 [2/1] [_U]

md1 : active raid1 sda2[0](F) sdb2[1]
      524276 blocks super 1.2 [2/1] [_U]

md0 : active raid1 sda1[0](F) sdb1[1]
      33553336 blocks super 1.2 [2/1] [_U]

unused devices: <none>

So /dev/sda seems to be gone from the RAID. Let’s do the checks.

Hardware check

hdparm:

# hdparm -I /dev/sda

/dev/sda:
HDIO_DRIVE_CMD(identify) failed: Input/output error 

smartctl:

# smartctl -a /dev/sda
smartctl 5.41 2011-06-09 r3365 [x86_64-linux-2.6.32-34-pve] (local build)
Copyright (C) 2002-11 by Bruce Allen, http://smartmontools.sourceforge.net

Vendor:               /0:0:0:0
Product:
User Capacity:        600,332,565,813,390,450 bytes [600 PB]
Logical block size:   774843950 bytes
scsiModePageOffset: response length too short, resp_len=47 offset=50 bd_len=46
>> Terminate command early due to bad response to IEC mode page
A mandatory SMART command failed: exiting. To continue, add one or more '-T permissive' options.

/dev/sda is dead, Jim

Next thing is to schedule a Disk Replacement and moving all services to another host/prepare the host to shutdown for maintenance.

Preparation for disk replacement

Stop all running Containers:

# for VE in $(vzlist -Ha -o veid); do vzctl stop $VE; done

I also disabled the “start at boot” option to have a quick startup of the Proxmox Node.

Next: Remove the faulty disk from the md-RAID:

# mdadm /dev/md0 -r /dev/sda1
# mdadm /dev/md1 -r /dev/sda2
# mdadm /dev/md2 -r /dev/sda3
# mdadm /dev/md3 -r /dev/sda4

Shutting down the System.

… some guy in the DC moved to the server at the expected time and replaces the faulty disk …

After that, the system is online again.

  1. copy partition table from /dev/sdb to /dev/sda
    # sgdisk -R /dev/sda /dev/sdb
    
  2. recreate the GUID for /dev/sda
    # sgdisk -G /dev/sda
    

Then add /dev/sda to the RAID again.

# mdadm /dev/md0 -a /dev/sda1
# mdadm /dev/md1 -a /dev/sda2
# mdadm /dev/md2 -a /dev/sda3
# mdadm /dev/md3 -a /dev/sda4


# cat /proc/mdstat
Personalities : [raid1]
md3 : active raid1 sda4[2] sdb4[1]
      1822442815 blocks super 1.2 [2/1] [_U]
      [===>.................]  recovery = 16.5% (301676352/1822442815) finish=329.3min speed=76955K/sec

md2 : active raid1 sda3[2] sdb3[1]
      1073740664 blocks super 1.2 [2/2] [UU]

md1 : active raid1 sda2[2] sdb2[1]
      524276 blocks super 1.2 [2/1] [_U]
        resync=DELAYED

md0 : active raid1 sda1[2] sdb1[1]
      33553336 blocks super 1.2 [2/2] [UU]

unused devices: <none>

After nearly 12h, the resync was completed:

diskstats_iops-day

and then this happened:

# vzctl start 300
# vzctl enter 300
enter into CT 300 failed
Unable to open pty: No such file or directory

There are plenty of comments if you search for Unable to open pty: No such file or directory

But

# svzctl exec 300 /sbin/MAKEDEV tty
# vzctl exec 300 /sbin/MAKEDEV pty
# vzctl exec 300 mknod --mode=666 /dev/ptmx c 5 2

did not help:

# vzctl enter 300
enter into CT 300 failed
Unable to open pty: No such file or directory    

And

# strace -ff vzctl enter 300

produces a lot of garbage – meaning stacktraces that did not help to solve the problem.
Then we were finally able to enter the container:

# vzctl exec 300 mount -t devpts none /dev/pts

But having a look into the process list was quite devastating:

# vzctl exec 300 ps -A
  PID TTY          TIME CMD
    1 ?        00:00:00 init
    2 ?        00:00:00 kthreadd/300
    3 ?        00:00:00 khelper/300
  632 ?        00:00:00 ps    

That is not really what you expect when you have a look into the process list of a Mail-/Web-Server, isn’t it?
After looking araound into the system and searching through some configuration files, it became obvious, that there was a system update in the past, but someone forgot to install upstart. So that was easy, right?

# vzctl exec 300 apt-get install upstart
Reading package lists...
Building dependency tree...
Reading state information...
The following packages will be REMOVED:
  sysvinit
The following NEW packages will be installed:
  upstart
WARNING: The following essential packages will be removed.
This should NOT be done unless you know exactly what you are doing!
  sysvinit
0 upgraded, 1 newly installed, 1 to remove and 0 not upgraded.
Need to get 486 kB of archives.
After this operation, 851 kB of additional disk space will be used.
You are about to do something potentially harmful.
To continue type in the phrase 'Yes, do as I say!'
 ?] Yes, do as I say!

BUT:

Err http://ftp.debian.org/debian/ wheezy/main upstart amd64 1.6.1-1
  Could not resolve 'ftp.debian.org'
Failed to fetch http://ftp.debian.org/debian/pool/main/u/upstart/upstart_1.6.1-1_amd64.deb  Could not resolve     'ftp.debian.org'
E: Unable to fetch some archives, maybe run apt-get update or try with --fix-missing?

No Network – doooh.

So… that was that. Another plan to: chroot. Let’s start:
First we need to shutdown the container – or at least what is running of it:

# vzctl stop 300
Stopping container ...
Container is unmounted    

Second, we have to mount a bunch of devices to the FS:

# mount -o bind /dev /var/lib/vz/private/300/dev
# mount -o bind /dev/shm /var/lib/vz/private/300/dev/shm
# mount -o bind /proc /var/lib/vz/private/300/proc
# mount -o bind /sys /var/lib/vz/private/300/sys

Then perform the chroot and the installtion itself:

# chroot /var/lib/vz/private/300 /bin/bash -i

# apt-get install upstart
# exit      

At last, umount all the things:

# umount -l /var/lib/vz/private/300/sys
# umount -l /var/lib/vz/private/300/proc
# umount -l /var/lib/vz/private/300/dev/shm
# umount -l /var/lib/vz/private/300/dev

If you have trouble, because some of the devices are busy, kill the processes you find out with:

# lsof /var/lib/vz/private/300/dev

Or just clean the whole thing

# lsof 2> /dev/null | egrep '/var/lib/vz/private/300'    

Try to umount again :-).

Now restarting the container again.

# Starting container ...
# Container is mounted
# Adding IP address(es): 10.10.10.130
# Setting CPU units: 1000
# Setting CPUs: 2
# Container start in progress...  

And finally:

 # vzctl enter 300
 root@300 #  
 root@300 # ps -A | wc -l
 142

And this looks a lot better \o/.

Install CoreOS on Proxmox

Flattr this!

Some words before we start…

Hello Blog, it’s been a while. I still have to deliver the last part of the Munin Plugin Development Series (Part 1, 2, 3).

Today I would like to write something about the Setup of a CoreOS Environment on Proxmox. Proxmox is a Debian based Distribution that bundles a Web UI for OpenVZ+KVM and some great Tools for Clustering and Multi-Tenancy Installations. I am using Proxmox as a Hosting Platform for some years now and I am still amazed about the stability and the way things work out so far. I plan to create another Series about things around Proxmox (e.g. Cluster Setup using Tinc/Live Migration of VMs and the overall Network Setup).

But now, let’s dive into the Topic…


VM Setup

My Proxmox Hosts uses private Networks, both for OpenVZ Containers as well as for KVM VMs.
Both private Networks have Internet Access via the Standard Linux IP Forwarding Functions.
Configuration is done via iptables, e.g. for our private KVM Network 10.10.0.0:


iptables -t nat -A POSTROUTING -s 10.10.0.0/24 -o eth0 -j SNAT --to ${EXT_IP}

Now, create a (KVM) VM in Proxmox. I picked 2 Cores and 2Gigs of RAM. Choose VirtIO for the Disk as well as the Network. This will provide much better Performance and works out of the Box, since CoreOS has build-in support for VirtIO.

The basic steps for the Setup are:

setup1setup2setup3setup4setup5setup6setup7setup8

Now start you VM and open the Console:

start.new.vm


Preparations

Downlaod the CoreOS ISO

[user@proxmox]# pwd
/var/lib/vz/template/iso
[user@proxmox]# wget http://stable.release.core-os.net/amd64-usr/current/coreos_production_iso_image.iso

Note your public SSH Key

[user@proxmox]# cat ~/.ssh/id_rsa.pub

becoming root

coreos ~ # sudo su - root

update the root password

coreos ~ # passwd

Setup the basic Network.

coreos ~ # ifconfig eth0 10.10.0.111 netmask 255.255.255.0 up

SSH into your system

[root@cleopatra iso]# ssh root@10.10.0.111
The authenticity of host '10.10.0.111 (10.10.0.111)' can't be established.
RSA key fingerprint is XX:XX:XX:XX:XX:XX:XX:XX:XX:XX:XX:XX:XX:XX:XX:XX.
Are you sure you want to continue connecting (yes/no)? yes    
root@10.10.0.111's password:
CoreOS stable (766.3.0)
Update Strategy: No Reboots  

Finish Network Configuration

coreos ~ # route add default gw 10.10.0.1
coreos ~ # echo "nameserver 8.8.8.8" > /etc/resolv.conf

Installation

see https://coreos.com/os/docs/latest/installing-to-disk.html

Download Config Template

coreos ~ # wget https://gist.githubusercontent.com/phaus/e52241b66576d4484f6f/raw/9032faaa69bc05ebc8b08efb518f2a90bfef4dca/coreos1-config-coreos.yml

Adjust the Configuration as required

coreos ~ # cat coreos1-config-coreos.yml
#cloud-config
hostname: "coreos1"

# include one or more SSH public keys
ssh_authorized_keys:
  - ssh-rsa XXX

coreos:

  units:
    - name: systemd-networkd
      command: stop
    - name: 00-static.network
      runtime: true
      content:  |
        [Match]
        Name=eth*
        [Network]
        Gateway=10.10.0.1
        Address=10.10.0.111/24    
        DNS=8.8.8.8    
    - name: systemd-networkd
      command: start
    - name: etcd2.service
      command: start
    - name: fleet.service
      command: start

Replace XXX with your public SSH Key.

Install CoreOS to /dev/vda (it is vda since VirtIO Device are mapped to vdX)

coreos ~ # coreos-install -d /dev/vda -C stable -c ~/coreos1-config-coreos.yml
Checking availability of "local-file"
Fetching user-data from datasource of type "local-file"
Downloading the signature for http://stable.release.core-os.net/amd64-usr/766.3.0/coreos_production_image.bin.bz2...
2015-09-28 20:59:39 URL:http://stable.release.core-os.net/amd64-usr/766.3.0/coreos_production_image.bin.bz2.sig [543/543] -> "/tmp/coreos-install.2oAX9KwZlj/coreos_production_image.bin.bz2.sig" [1]
Downloading, writing and verifying coreos_production_image.bin.bz2...
2015-09-28 21:00:09 URL:http://stable.release.core-os.net/amd64-usr/766.3.0/coreos_production_image.bin.bz2 [195132425/195132425] -> "-" [1]
gpg: Signature made Wed Sep  2 04:32:09 2015 UTC using RSA key ID E5676EFC
gpg: key 93D2DCB4 marked as ultimately trusted
gpg: checking the trustdb
gpg: 3 marginal(s) needed, 1 complete(s) needed, PGP trust model
gpg: depth: 0  valid:   1  signed:   0  trust: 0-, 0q, 0n, 0m, 0f, 1u
gpg: Good signature from "CoreOS Buildbot (Offical Builds) <buildbot@coreos.com>" [ultimate]
gpg: Note: This key has expired!
Primary key fingerprint: 0412 7D0B FABE C887 1FFB  2CCE 50E0 8855 93D2 DCB4
     Subkey fingerprint: EEFA 7555 E481 D026 CC40  D8E6 A5A9 6635 E567 6EFC
Installing cloud-config...
Success! CoreOS stable 766.3.0 is installed on /dev/vda

Check your Installation

coreos ~ # mount /dev/vda9 /mnt
coreos ~ # cd /mnt/

Please keep in mind, that most of the Configuration will take place during the first boot of your new Instance.

Time for a Shutdown

coreos ~ # shutdown -h now
PolicyKit daemon disconnected from the bus.
We are no longer a registered authentication agent.
Connection to 10.10.0.111 closed by remote host.
Connection to 10.10.0.111 closed.    

First Boot

Start the VM again (this time it should boot from the internal disk – you can also remove the ISO File, just to be sure). Also the Node should apply the correct Network Configuration.

You should see something like this:

start.instance


SSH into your new node

[root@cleopatra iso]# ssh core@10.10.0.105

You might get this Warning:

@@@@@@@@@@@@@@@@@@@@@@@@@@@@@@@@@@@@@@@@@@@@@@@@@@@@@@@@@@@
@    WARNING: REMOTE HOST IDENTIFICATION HAS CHANGED!     @
@@@@@@@@@@@@@@@@@@@@@@@@@@@@@@@@@@@@@@@@@@@@@@@@@@@@@@@@@@@
IT IS POSSIBLE THAT SOMEONE IS DOING SOMETHING NASTY!
Someone could be eavesdropping on you right now (man-in-the-middle attack)!
It is also possible that a host key has just been changed.
The fingerprint for the RSA key sent by the remote host is
xx:xx:xx:xx:xx:xx:xx:xx:xx:xx:xx:xx:xx:xx:xx:xx.
Please contact your system administrator.
Add correct host key in /root/.ssh/known_hosts to get rid of this message.
Offending RSA key in /root/.ssh/known_hosts:13
RSA host key for 10.10.0.111 has changed and you have requested strict checking.
Host key verification failed

That is fine, since the CoreOS Host just changed it’s SSH Host Key. Just remove the problematic line (in this case line 13) from you /root/.ssh/known_hosts.

After that you should be fine:

[user@proxmox]# ssh core@10.10.0.111
Last login: Tue Sep 29 08:50:48 2015 from 10.10.0.1
CoreOS stable (766.3.0)
Failed Units: 1
  user-cloudinit@var-lib-coreos\x2dinstall-user_data.service
core@coreos1 ~ $ sudo -s
coreos1 core #

Now we need to fix the Configuration. Before that, we should create two more CoreOS Hosts to have a Cluster ready.

Writing Munin Plugins pt3: some Stats about VMWare Fusion

Flattr this!

In a project where we had the need for VMs being capable of doing CI for Java and also doing CI for iOS Application (using XCode Build Bots), we decided to go with a Mac OS Server as the Host Platform and using VMWare Fusion as the base Virtualisation System. We had several VMs there (Windows, Solaris, Linux and Mac OS). Doing a proper Monitoring for theses VMs was not that easy. We already had a working Munin Infrastructure, but no Plugin for displaying VMWare Fusion Stats existed.

The first approach was to use the included VMTools for gathering the information, since we already used them to start/stop/restart VMs via CLI/SSH:

#!/bin/bash

echo "starting VMS..."
VM_PATH=/Users/Shared/VMs
TOOL_PATH=/Applications/VMTools
$TOOL_PATH/vmrun -T fusion start $VM_PATH/Mac_OS_X_10.9.vmwarevm/Mac_OS_X_10.9.vmx nogui

or

#!/bin/bash

echo "starting VMS..."
VM_PATH=/Users/Shared/VMs
TOOL_PATH=/Applications/VMTools
$TOOL_PATH/vmrun -T fusion stop $VM_PATH/Mac_OS_X_10.9.vmwarevm/Mac_OS_X_10.9.vmx

But it was very hard to receive the interesting Data from the Log Files (statistica data is only really supported in VMWare ESXi). So we choose the direct way, to receive the live data, using ps. So this approach is also applicable for other Applications as well.

Our goal was to get at lease three Graphs (% of used CPU, % of used Memory and physically used Memory) sorted by VM Name.

ps -A | grep vmware-vmx

provides us with a list of all running vmware processes. Since we only need specific Data, we add some more filters:

ps -A -c -o pcpu,pmem,rss=,args,comm -r | grep vmware-vmx

29,4 14,0 2341436   J2EE.vmx                                                 vmware-vmx
1,7 12,9 2164200    macos109.vmx                                             vmware-vmx
1,4 17,0 2844044    windows.vmx                                              vmware-vmx
0,7  6,0 1002784    Jenkins.vmx                                              vmware-vmx
0,0  0,0    624     grep vmware-vmx      

where this is the description (man ps) of the used columns:

  • %cpu percentage CPU usage (alias pcpu)
  • %mem percentage memory usage (alias pmem)
  • rss the real memory (resident set) size of the process (in 1024 byte units).

You might see several things: First we have our data and the Name of each VM. Second, we have to get rid of the last line, since that is our grep process. Third, we might need to do some String Operations/Number Calculation to get some valid Data at the end.

Since Perl is a good choice if you need to do some String Operations, the Plugins is written in Perl :-).

Let’s have a look.
The Config Element is quite compact (e.g. for the physical mem):

my $cmd = "ps -A -c -o pcpu,pmem,rss=,args,comm -r | grep vmware-vmx";
my $output = `$cmd`;
my @lines=split(/\n/,$output);
...
if( $type eq "mem" ) {
    print $base_config;
    print "graph_args --base 1024 -r --lower-limit 0\n";    
    print "graph_title absolute Memory usage per VM\n";
    print "graph_vlabel Memory usage\n";
    print "graph_info The Graph shows the absolute Memory usage per VM\n";  
    foreach my $line(@lines) {
        if( $line  =~ /(?<!grep)$/ ) {  
            my @vm = ();
            my $count = 0;
            my @array=split(/ /,$line); 
            foreach my $entry(@array) {
                if( length($entry) > 2 ){
                    $vm[$count]=$entry;
                    $count++;
                }
            }
            $vm[3] = clean_vmname($vm[3]);  
            if( $vm[3] =~ /(?<!comm)$/) {           
                if( $lcount > 0 ){
                    print "$vm[3]_mem.draw STACK\n";
                } else {
                    print "$vm[3]_mem.draw AREA\n";
                }
                print "$vm[3]_mem.label $vm[3]\n";
                print "$vm[3]_mem.type GAUGE\n";            
                $lcount++;      
            }           
        }
    }                       
}

After the basic Setup (Category, Graph Type, Labels, etc. ) we go through each line of the output from the ps command, filtering the line containing grep.
We use the stacked Graph Method, so the first entry has to be the base Graph, the following ones will just be layer on top of the first. To get clean VM Names, we have a quite simple function clean_vmname:

sub clean_vmname {
    my $vm_name = $_[0];
    $vm_name =~ s/\.vmx//;
    $vm_name =~ s/\./\_/g;
    return $vm_name;
}

The Code, that delivers the Data looks similar. We just piping the values from the ps command to the output:

foreach my $line(@lines) {
    if( $line  =~ /(?<!grep)$/ ) {
        my @vm = ();
        my $count = 0;
        my @array=split(/ /,$line); 
        foreach my $entry(@array) {
            if( length($entry) > 2 ){
                $vm[$count]=$entry;
                $count++;
            }
        }
        $vm[3] = clean_vmname($vm[3]);
        if( $vm[3] =~ /(?<!comm)$/) {   
            if( $type eq "pcpu" ) {
                print "$vm[3]_pcpu.value $vm[0]\n";
            }
            if( $type eq "pmem" ) {
                print "$vm[3]_pmem.value $vm[1]\n";
            }
            if( $type eq "mem" ) {
                my $value =  ($vm[2]*1024);
                print "$vm[3]_mem.value $value\n";
            }
        }
    }
}   

You can find the whole plugin here on GitHub.

Here are some example Graphs you will get as a result:


fusion_mem-month fusion_pcpu-month fusion_pmem-month

Creating a SmartOS Dataset for Windows Server 2012 r2

Flattr this!

I postet about SmartOS almost 1 1/2 Year ago. Since i am still using SmartOS here and then for primary testing purpose, i decided to create a new Post about how to make your own Datasets, to make several VMs based on the same Image possible. As Microsoft also introduces their latest Server OS (Windows Server 2012 r2) as a Preview Version, i choosed this OS for the Test, since i guess besides SmartOS itself and Linux, which has already a lot of Dataset present, Windows might be the next common OS to use in a VM.

Prerequisites

You should already have these Software Packages:

SmartOS Download
http://wiki.smartos.org/display/DOC/Download+SmartOS
Windows Server 2012 R2 Preview
http://technet.microsoft.com/de-DE/evalcenter/dn205287.aspx you should rename the ISO e.g. to win2k12r2_de.iso
TightVNC Java Viewer JAR
http://www.tightvnc.com/download.php

You should have SmartOS installed on a proper Hardware (at least > 50GB Disk and proper KVM support – this means a recent Intel CPU and working VT-x/EPT). I am using VMWare Fusion 5 for this, since there is a specific Setting for supporting VM internal Virtualization.

The Setup of SmartOS is pretty straigh forward. You can have a short description here [1].

In this tutorial i will choose [client] when you have to run the command on your Workstation and [smartos] when you should run it on your SmartOS Host (e.g. via SSH).

SmartOS Configuration

You should check the current Host Configuration of you SmartOS System first. The CLI Tools for this are sometimes different than e.g. in Linux [2].

First you need to find your Host Network Gateway (here 172.16.108.2)

[smartos] /usr/bin/netstat -r

Routing Table: IPv4
  Destination           Gateway           Flags  Ref     Use     Interface
-------------------- -------------------- ----- ----- ---------- ---------
default              172.16.108.2         UG        3        443 e1000g0
localhost            localhost            UH        2        310 lo0
172.16.108.0         00-50-56-28-a8-14    U         5    1694314 e1000g0

Routing Table: IPv6
  Destination/Mask            Gateway                   Flags Ref   Use    If
--------------------------- --------------------------- ----- --- ------- -----
localhost                   localhost                   UH      2      12 lo0

[smartos] /usr/bin/sysinfo -p

Live_Image='20130629T040542Z'
System_Type='SunOS'
Boot_Time='1375215743'
Manufacturer='VMware, Inc.'
Product='VMware Virtual Platform'
Serial_Number='VMware-56 4d 56 5e e8 ff 08 7b-38 81 e6 57 ac d8 b9 7d'
VM_Capable='true'
CPU_Type='Unknown'
CPU_Virtualization='vmx'
CPU_Physical_Cores=4
Nic_Tags=admin
Setup=''
UUID='564d565e-e8ff-087b-3881-e657acd8b97d'
Hostname='00-50-56-28-a8-14'
CPU_Total_Cores=4
MiB_of_Memory=8191
Disk_c1t0d0_size_in_GB=268
Disk_c1t1d0_size_in_GB=268
NIC_admin='e1000g0'
Network_Interface_e1000g0_MAC_Address='00:50:56:28:a8:14'
Network_Interface_e1000g0_IPv4_Address='172.16.108.135'
Network_Interface_e1000g0_NIC_Names='admin'
Network_Interface_e1000g0_Link_Status='up'
Network_Interface_e1000g1_MAC_Address='00:50:56:21:c3:ec'
Network_Interface_e1000g1_IPv4_Address=''
Network_Interface_e1000g1_NIC_Names=''
Network_Interface_e1000g1_Link_Status='up'
Bootparam_console='text'
Bootparam_root_shadow='$5$2HOHRnK3$NvLlm.1KQBbB0WjoP7xcIwGnllhzp2HnT.mDO7DpxYA'
Bootparam_smartos='true'

[smartos] /usr/sbin/dladm show-link

LINK        CLASS     MTU    STATE    BRIDGE     OVER
e1000g0     phys      1500   up       vmwarebr   --
e1000g1     phys      1500   up       --         --
vmwarebr0   bridge    1500   up       --         e1000g0

VM Setup

VM Configuration

[smartos] /usr/bin/cat /opt/win2k12r2_vm.json

{
  "brand": "kvm",
  "alias": "win2k12r2",
  "vcpus": 2,
  "autoboot": false,
  "ram": 2048,
  "resolvers": ["8.8.8.8"],
  "disks": [
    {
       "boot": true,
       "model": "ide", 
      "size": 40960
    }
  ],
  "nics": [
    {
      "nic_tag": "admin",
      "model": "e1000",
      "ip": "172.16.108.201",
      "netmask": "255.255.255.0",
      "gateway": "172.16.108.2",
      "primary": 1
    }
  ]
}

Your main Tool for VM Administration ist vmadm [3].

[smartos] /usr/sbin/vmadm create -f /opt/win2k12r2_vm.json

Successfully created VM 37d3cef6-01a6-4b25-a927-928cc2681744

[smartos] /usr/sbin/vmadm list

UUID                                  TYPE  RAM      STATE             ALIAS
37d3cef6-01a6-4b25-a927-928cc2681744  KVM   2048     stopped           win2k12r2

[smartos] /usr/sbin/zfs list

NAME                                               USED  AVAIL  REFER  MOUNTPOINT
zones                                             52,3G   192G   652K  /zones
zones/37d3cef6-01a6-4b25-a927-928cc2681744        39,5K  10,0G  39,5K  /zones/37d3cef6-01a6-4b25-a927-928cc2681744
zones/37d3cef6-01a6-4b25-a927-928cc2681744-disk0    40G   232G    16K  -
zones/config                                        41K   192G    41K  legacy
zones/cores                                         62K  10,0G    31K  /zones/global/cores
zones/cores/37d3cef6-01a6-4b25-a927-928cc2681744    31K  10,0G    31K  /zones/37d3cef6-01a6-4b25-a927-928cc2681744/cores
zones/dump                                        4,00G   192G  4,00G  -
zones/opt                                         31,5K   192G  31,5K  legacy
zones/swap                                        8,25G   200G    16K  -
zones/usbkey                                       127K   192G   127K  legacy
zones/var                                         2,08M   192G  2,08M  legacy

You need to copy the installation ISO Image into your VM Zone:

[client] scp win2k12r2_de.iso root@172.16.108.135:/zones/37d3cef6-01a6-4b25-a927-928cc2681744/root/

After that you can boot your VM with the ISO Image attached:

[smartos] /usr/sbin/vmadm boot 37d3cef6-01a6-4b25-a927-928cc2681744 order=cd,once=d cdrom=/win2k12r2_de.iso,ide

Successfully started VM 37d3cef6-01a6-4b25-a927-928cc2681744

You can access your VM via a VNC Viewer (we are using TightVNC). You can get the necessary connection setting via:

[smartos] /usr/sbin/vmadm info 37d3cef6-01a6-4b25-a927-928cc2681744 vnc

{
  "vnc": {
    "host": "172.16.108.135",
    "port": 34783,
    "display": 28883
  }
}

You can now extract the TightVNC Zip you downloaded before. Withing the folder classes you type:

[client] java VncViewer HOST 172.16.108.135 PORT 34783

The Port and the Host URL may differ. The Port will change everytime your VM reboots.

Setup

VNCSetup1
VNCSetup2

Running System

After a Reboot, the Login Screen greets us:

VNCRunning1

The Network also seems to work :-).

VNCRunning2

Dataset Creation

We can now start to create our VM Package. For that we need to shutdown our VM:

VNCShutdown1

VNCShutdown2

[smartos] /usr/sbin/vmadm list

UUID                                  TYPE  RAM      STATE             ALIAS
37d3cef6-01a6-4b25-a927-928cc2681744  KVM   2048     stopped           win2k12r2

The first step is to create a ZFS Snapshot of that specific VM Disk:

So let’s have a look:
[smartos] /usr/sbin/zfs list

NAME                                               USED  AVAIL  REFER  MOUNTPOINT
zones                                             52,3G   192G   652K  /zones
zones/37d3cef6-01a6-4b25-a927-928cc2681744        39,5K  10,0G  39,5K  /zones/37d3cef6-01a6-4b25-a927-928cc2681744
zones/37d3cef6-01a6-4b25-a927-928cc2681744-disk0    40G   232G    16K  -
zones/config                                        41K   192G    41K  legacy
zones/cores                                         62K  10,0G    31K  /zones/global/cores
zones/cores/37d3cef6-01a6-4b25-a927-928cc2681744    31K  10,0G    31K  /zones/37d3cef6-01a6-4b25-a927-928cc2681744/cores
zones/dump                                        4,00G   192G  4,00G  -
zones/opt                                         31,5K   192G  31,5K  legacy
zones/swap                                        8,25G   200G    16K  -
zones/usbkey                                       127K   192G   127K  legacy
zones/var                                         2,08M   192G  2,08M  legacy

It seems, that our disk is zones/37d3cef6-01a6-4b25-a927-928cc2681744-disk0 a zvol.

[smartos] /usr/sbin/zfs snapshot zones/37d3cef6-01a6-4b25-a927-928cc2681744-disk0@dataset

Let’s look for the Snapshot:

[smartos] /usr/sbin/zfs list -t snapshot

NAME                                                       USED  AVAIL  REFER  MOUNTPOINT
zones/37d3cef6-01a6-4b25-a927-928cc2681744-disk0@dataset      0      -  7,36G  -

There it is. Now we need to compress it, since this will be our vanilla Image.

[smartos] /usr/sbin/zfs send zones/37d3cef6-01a6-4b25-a927-928cc2681744-disk0@dataset | /usr/bin/gzip > /tmp/win2k12r2_de.zvol.gz

Wait…

Now we only need size and the SHA1 Checksum of that Image for the Manifest file.

[smartos] /usr/bin/digest -a sha1 win2k12r2_de.zvol.gz

Wait…

0d955b91973bdaccc30ffa75b856709ce9a1953a

[smartos] /usr/bin/ls /tmp

...
-rw-r--r--   1 root     root     3933399939 Jul 30 22:20 win2k12r2_de.zvol.gz
...

So our matching Dataset Manifest File might look like this:

[smartos] /usr/bin/cat /tmp/win2k12r2_vm.json

{
    "name": "win2k12r2de",
    "version": "1.0",
    "type": "zvol",
    "cpu_type": "host",
    "description": "Windows Server 2012 R2 Preview DE",
    "created_at": "2013-07-31T11:40:00.000Z",
    "updated_at": "2013-07-31T11:40:00.000Z",
    "published_at": "2013-07-31T11:40:00.000Z",
    "os": "windows",
    "image_size": "40960",
    "files": [
        {
            "path": "win2k12r2_de.zvol.gz",
            "sha1": "0d955b91973bdaccc30ffa75b856709ce9a1953a",
            "size": 3933399939
        }
    ],
    "requirements": {
        "networks": [
            {
                "name": "net0",
                "description": "public"
            }
        ]
    },
    "disk_driver": "ide",
    "nic_driver": "e1000",
    "uuid": "857ea9a0-f965-11e2-b778-0800200c9a66",
    "creator_uuid": "0e70a5a1-0115-4a2b-b260-94723fd31bf1",
    "vendor_uuid": "0e70a5a1-0115-4a2b-b260-94723fd31bf1",
    "owner_uuid": "0e70a5a1-0115-4a2b-b260-94723fd31bf1",
    "creator_name": "Philipp Haussleiter",
    "platform_type": "smartos",
    "urn": "smartos:phaus:win2k12r2de:1.0"
}

You can now install the new Dataset to your local Image Store:

[smartos] /usr/sbin/imgadm install -m /tmp/win2k12r2_de.json -f /tmp/win2k12r2_de.zvol.gz

Installing image 857ea9a0-f965-11e2-b778-0800200c9a66 (win2k12r2de 1.0)
857ea9a0-f965-11e2-b778-0800200c9a66      [==============================>                 ]  19% 727.97MB  11.39MB/s  4m25s
…
Installed image 857ea9a0-f965-11e2-b778-0800200c9a66 to "zones/857ea9a0-f965-11e2-b778-0800200c9a66".

Wait…

[smartos] /usr/sbin/imgadm list

UUID                                  NAME         VERSION  OS       PUBLISHED
…
857ea9a0-f965-11e2-b778-0800200c9a66  win2k12r2de  1.0      windows  2013-07-31T11:40:00Z
…

You can now using this image as a normal SmartOS Dataset with the UUID 857ea9a0-f965-11e2-b778-0800200c9a66.

Feel free to comment if you have questions or problems.

Links

[1] SmartOS – Basic Setup
http://blog.smartcore.net.au/smartos-the-basics/
[2] The Linux-to-SmartOS Cheat Sheet
http://wiki.smartos.org/display/DOC/The+Linux-to-SmartOS+Cheat+Sheet
[3] Using vmadm to manage virtual machines
http://wiki.smartos.org/display/DOC/Using+vmadm+to+manage+virtual+machines
[4] Some extra Configuration Options for SmartOS
http://wiki.smartos.org/display/DOC/extra+configuration+options
[5] How to create a SmartOS Dataset
http://www.nickebo.net/creating-smartos-datasets

Joyent SmartOS Mysql VM Setup

Flattr this!

I just played around with the new SmartOS from Joyent ( Homepage ). I followed a basic tutorial from a Blog called opusmagnus to setup my basic SmartOS Machine on Virtualbox. You basically just have to insert the latest iso image and startup the VM (SmartOS is a system that runs from a live Medium – an DVD- or USB Image, so all your harddisk belongs to your VMs).

I will just summarize the basic steps to setup a basic VM for Mysql (you should also read the original post here).
After you installed your VM (setup Networking/ZFS Pool – you should use >3 virtual harddisks), you login into your new system and perfom the following steps:

Check for VM-Templates to install:

# dsadm avail
UUID                                 OS      PUBLISHED  URN                    
9dd7a770-59c7-11e1-a8f6-bfd6347ab0a7 smartos 2012-02-18 sdc:sdc:percona:1.3.8  
467ca742-4873-11e1-80ea-37290b38d2eb smartos 2012-02-14 sdc:sdc:smartos64:1.5.3
7ecb80f6-4872-11e1-badb-3f567348a4b1 smartos 2012-02-14 sdc:sdc:smartos:1.5.3  
1796eb3a-48d3-11e1-94db-3ba91709fad9 smartos 2012-01-27 sdc:sdc:riak:1.5.5     
86112bde-43c4-11e1-84df-8f7fd850d78d linux   2012-01-25 sdc:sdc:centos6:0.1.1  
...
5fef6eda-05f2-11e1-90fc-13dac5e4a347 smartos 2011-11-03 sdc:sdc:percona:1.2.2  
d91f80a6-03fe-11e1-8f84-df589c77d57b smartos 2011-11-01 sdc:sdc:percona:1.2.1  
...
9199134c-dd79-11e0-8b74-1b3601ba6206 smartos 2011-09-12 sdc:sdc:riak:1.4.1     
3fcf35d2-dd79-11e0-bdcd-b3c7ac8aeea6 smartos 2011-09-12 sdc:sdc:mysql:1.4.1    
...
7456f2b0-67ac-11e0-b5ec-832e6cf079d5 smartos 2011-04-15 sdc:sdc:nodejs:1.1.3   
febaa412-6417-11e0-bc56-535d219f2590 smartos 2011-04-11 sdc:sdc:smartos:1.3.12

I choose a percona VM (that is a VM with MySQL and some Backup Stuff pre-install – more here).

# dsadm import  a9380908-ea0e-11e0-aeee-4ba794c83c33
a9380908-ea0e-11e0-aeee-4ba794c83c33 doesnt exist. continuing with install
a9380908-ea0e-11e0-aeee-4ba794c83c33 successfully installed

Then you need to create a basic VM-Config file /tmp/percona-vm:

{
        "alias": "percona-vm",
        "brand": "joyent",
        "dataset_uuid": "a9380908-ea0e-11e0-aeee-4ba794c83c33",
        "dns_domain": "haussleiter.de",
        "quota": "10",
        "nics": [
                {
                        "nic_tag": "admin",
                        "ip": "192.168.178.42",
                        "netmask": "255.255.255.0",
                        "gateway": "192.168.178.1"
                }
        ]
}

You are now able to create your VM:

# vmadm create -f /tmp/percona-vm
Successfully created df4108a7-c3af-4372-b959-6066c70661e9

You can check if your new VM is running:

# vmadm list
UUID                                  TYPE  RAM      STATE             ALIAS
df4108a7-c3af-4372-b959-6066c70661e9  OS    256      running           percona-vm

# ping 192.168.178.42
192.168.178.42 is alive

You can login in your VM (that is a Zone to be precisely with the zlogin command):

# zlogin df4108a7-c3af-4372-b959-6066c70661e9
[Connected to zone 'df4108a7-c3af-4372-b959-6066c70661e9' pts/2]

Becourse i could not found any information about the predifined MySQL Password, i just change it using standard-Mylsq CMDs:
First you need to stop the Mysql Service:

# svcadm disable mysql:percona

Then you need to start Mysql again with skipping the tables for user-credentials.

# mysqld_safe --skip-grant-tables &

Enter Mysql CMD-Tools and change the root Password:

# mysql -uroot
mysql> use mysql;
mysql> update user set password=PASSWORD("NEW-ROOT-PASSWORD") where User='root';
mysql> flush privileges;
mysql> quit;

You need to shutdown your MySQL instance:

# prstat
   PID USERNAME  SIZE   RSS STATE  PRI NICE      TIME  CPU PROCESS/NLWP       
...
 10921 root     4060K 3016K cpu2     1    0   0:00:00 0.0% prstat/1
 10914 root     3200K 2236K sleep    1    0   0:00:00 0.0% bash/1
 10913 root     3172K 2244K sleep    1    0   0:00:00 0.0% login/1
 10894 mysql 207M 37M sleep 1 0 0:00:00 0.0% mysqld/27
...
kill 10894

You now can start the MySQL Daemon again.

# svcadm enable mysql:percona

I hope i will have time to look into more features of SmartOS. It seems to be a great System to Virtualize a lot of differend Service. It also supports virtualizing Windows VMs with KVM.

VirtualBox VMs auf Dual-Boot Systemen (FAT32 & 2GB Split Images)

Flattr this!

Die Nutzung von Dual-Boot Systemen (Linux/Windows oder Mac-OS/Windows) bietet sich manchmal an, um vielleicht neben der gängigen Arbeit auch noch mal ein Spiel zocken zu können.
Oder es ist einfach notwendig, eine VM auf einem mobilen Datenträge für die Nutzung auf unterschiedlichen Betriebssystemen zu verwenden.
Das einzige Dateisystem, welches auf allen aktuellen OS-Version ohne die Nutzung von irgendwelchen zusätzlichen Treibern für Schreib- und Lese-Zugriffe verwendet werden kann, ist immer noch FAT32.
Das Problem an der Sache ist nur, dass FAT32 Architektur-bedingt nur eine maximale Dateigröße von 2GB erlaubt.
Virtualbox nutzt standardmäßig das VDI Format, welches leider kein splitten der Image-Dateien erlaubt.

Allerdings fand ich auf der Seite von wischonline.de einen Post in dem erläutert wird, wie man mit dem CLI-Tool VBoxManage .vmdk Dateien erstellt werden können, welche sich in 2GB splitten lassen, aber ebenfalls auch mit Virtualbox nutzbar sind. Das .vmdk Format stammt ja eigentlich von VMWare, allerdingst unterstützt VirtualBox seit einigen Version auch dieses Format.

Als erstes sollte man dafür sorgen, dass VBoxManage im Pfad erreichbar ist (so das noch nicht der Fall ist). Unter Windows habe ich hierzu die Variabel VBOX_HOME auf C:\Program Files\Oracle\VirtualBox gesetzt und anschließend die Umgebungsvariabel PATH um %VBOX_HOME% erweitert (Trennzeichen ; nicht vergessen). Dieses Vorgehen erleichtern
ungemein die Lesbarkeit der PATH Variabel.
Um ein (mitwachsendes) Volume mit 64GB Größe zu erstellen, welche in 32 x 2GB Dateien gesplittet wird, reicht folgender Aufruf:

VBoxManage createhd --filename Win2k8-r2-disk1.vmdk --size 65536 --format vmdk --variant split2g

Anschließend reicht es aus, das neue Image in die vorhandene VM einzubinden und dann mit Imaging-Tools (z.b. gparted oder mit einem simplen DD) eine Copy der größeren Image-Datei durchzuführen. Hierbei sollte man immer stehts dran denken, das Boot-Flag auch in der neuen Partition mit zu setzen. Anschließen entfernt man das alte Image und bootet neu von dem neu erstellten VMDK Image.

VirtualBox error: fixing VDI already registered

Flattr this!

Oftmals ist es zweckmäßig, eine Art Template-Image für eine virtuelle Maschine (VM) zu erstellen, mit welchem man eine saubere Basis erhält, auf der man Software installieren kann, speziell für die einzelne VM.
Das Problem ist, dass VirtualBox in jedes VDI (virtual disk image) eine eindeutige ID schreibt, welche es verhindert, dass eine identische Copy eines Images mehrmals eingebunden wird.
Constantin Gonzalez hat dazu in seinem Blog eine interessante Lösung beschrieben.
Ich habe das zum Anlass genommen, diesen Befehl in ein bash-script zu gießen ;-).
Hier als das Script:

#!/bin/sh
# Copy VDI with unique identifier
if [ $# -ne 2 ]; then
    echo "Usage: ./copyVDI.sh <VID-source> <VID-target>"
    exit 1
else
    if [ $1 == $2 ]; then
        echo "VID-source has to be not equal to VID-target!"
        exit 1
    fi
    cp $1 $2
    dd if=/dev/random of=$2 bs=1 count=6 seek=402 conv=notrunc
    exit 0
fi

Das Script sollte selbsterklärend sein.
Faktisch kann man hiermit eine Copy eines VDIs anlegen, welche gleichzeitig eine eindeutige ID erhält.