Securely Connected Remote Work
AI . Network . Personal . Security . ToolingConnecting Distributed Nodes with a Nebula VPN
Remote work has become the norm in the current situation. In a digital working environment, this should actually offer optimal possibilities. But one thing can become a problem: essential systems required for the daily workflow often cannot be used in a remote-work context. Not every company has set up its infrastructure according to the Zero Trust model yet. Central systems are often only reachable through an internal network that is mostly sealed off from the outside world. If a VPN dial-in exists at all, it is usually only available to a handful of employees or is limited by the capacity of a central dial-in node.
Contents
Decentralized VPNs
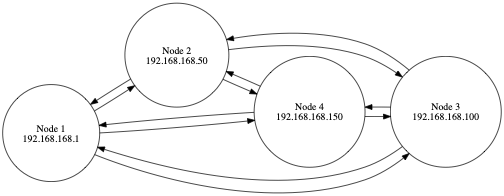
Besides the classic setup where VPN clients dial into a central VPN endpoint, distributed VPN systems have existed for a while. They establish secure connections between the individual members of a network. A well-known implementation of a peer2peer VPN is Tinc. Tinc often uses what is called mesh routing. This means a connection between two nodes can travel over multiple routes within a mesh. This has the big advantage that the VPN stays alive even if one of the connections fails.
A typical mesh network can look like this:
If the connection between Node 1 and Node 3 were interrupted, the traffic could still be routed through Node 2 or Node 4.
Setting up a Tinc mesh takes quite a bit of effort, though, because the nodes need to know each other’s certificates. A typical Tinc setup reads like this:
- Install tinc VPN on each node.
- Create the VPN’s working directory on each node.
- Create tinc.conf and host files on every node.
- Create VPN control scripts for all tinc instances.
- Create systemd unit files.
- Exchange host files amongst all nodes.
- Enable tinc systemd unit(s).
Automation solutions like Ansible can help here, but even then setting up a Tinc-based mesh is not trivial. Adding new nodes requires updating the other nodes as well.
Nebula VPN
At the end of last year, Slack released its internal solution for a distributed VPN as open source software. Slack also uses it as an overlay for its backend services. The software itself lives on GitHub and is further developed there.
But what exactly is Nebula?
Nebula is a scalable overlay networking tool with a focus on performance, simplicity and security. It lets you seamlessly connect computers anywhere in the world. Nebula is portable, and runs on Linux, OSX, and Windows.
So the main goals of Nebula are performance, simplicity, and security. The statement explicitly emphasizes that Slack uses this software to connect the laptops of its mobile employees.
Arstechnica published a tutorial fairly quickly after the release, walking through the rough points of a setup.
Based on that, here is a version with a few individual steps examined in more detail:
First, a few details:
- All connections are established directly between the individual peers. This creates a large-scale mesh that allows clients to connect via different routes.
- Data transfer itself is packet-based (UDP). This means that firewalls cause fewer problems for clients than with other VPNs (such as IPsec).
- Nebula uses the Noise Protocol Framework.
- Nebula uses certificates to validate node IPs, names, and membership in (self-defined) groups.
- The key exchange itself is based on elliptic curve Diffie-Hellman key exchange and AES-256-GCM.
- Every node builds its own routing table, which it can update with those of other nodes.
- There are discovery nodes (called
lighthouse), which enable connections between nodes behind a NAT layer. - After that, additional features (such as UDP hole punching) can be used.
Setting up the Base
The setup is divided into four steps:
- Setting up the PKI infrastructure
- Creating a plan
- Setting up (at least) one lighthouse node
- Setting up the remaining nodes
All necessary binaries can be found in the project’s releases. After unpacking the archive, we get two binaries:
nebula: The actual application to build the VPN.nebula-cert: A tool used for certificate management.
Setting up the PKI Infrastructure
First of all, we create a root certificate. With the private key, we can then provision all further certificates.
./nebula-cert ca -name "ACME Nebula Mesh Network"
We move the two created files ca.crt and ca.key into a separate directory certs. This root certificate is valid for one year. If there are good reasons to change the validity period, this can be done with the -duration parameter (e.g. ./nebula-cert ca -duration "10000h" ...).
It is advisable to store the root CA key only encrypted (e.g. with git-crypt).
Creating a Plan
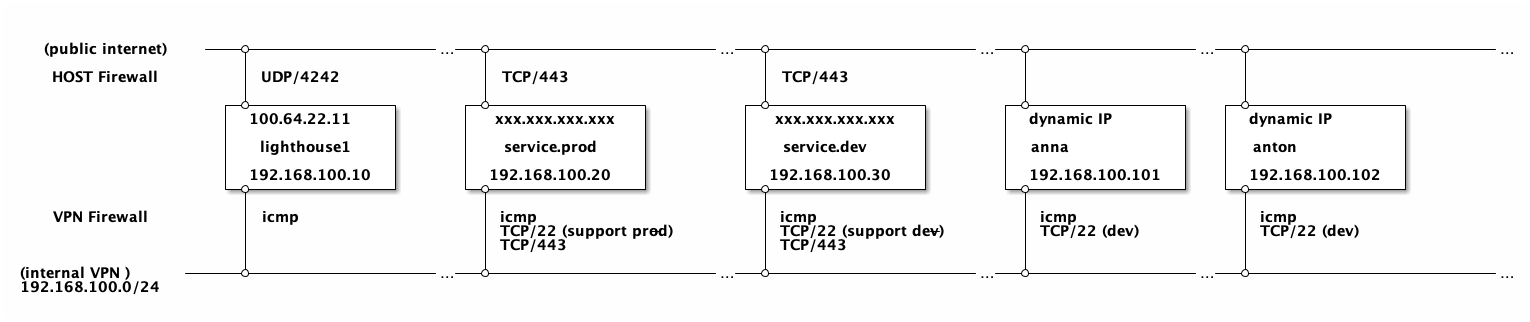
Before we continue, we should think about the network configuration. Every client receives a (fixed) IP address. In a normal subnet, these are 254 free addresses. Since the IP address of a VPN node is assigned when its certificate is created, it is advisable – especially for larger networks – to keep a list of the address allocation. This table can also contain the node groups, which enable more detailed access control (more on this later).
The following assumptions apply to our example:
- There are two internal systems,
service.devandservice.prod. - There are also two developers,
AnnaandAnton. - Both want to communicate with each other (and with other developers) via ssh (GIT) and http(s).
Antonshould only have SSH access toservice.dev.Anna, in addition toservice.dev, also has SSH access toservice.prod.service.devandservice.prodare reachable for all VPN participants via http(s).- In addition, there is a lighthouse instance
lighthouse1.
We now define the following groups:
dev: The group of developers.support-dev: SSH access to Dev.support-prod: SSH access to Prod.
We can now create the following table:
| Host | IP | Groups |
|---|---|---|
| lighthouse1 | 192.168.100.10 | |
| service.prod | 192.168.100.20 | |
| service.dev | 192.168.100.30 | |
| anna | 192.168.100.101 | dev, support-dev, support-prod |
| anton | 192.168.100.102 | dev, support-dev |
If we look at the setup in a network overview, it looks like this:

Setting up a Lighthouse Node
Setting up the lighthouse node differs little from setting up another client. The only difference is a different configuration.
The configuration itself is created in a file named config.yml. Before we deal with the configuration in detail, we first have to create a certificate for the new node. For our lighthouse node, this is done with:
./nebula-cert sign \
    -name "lighthouse1" \
    -ca-crt "certs/ca.crt" \
    -ca-key "certs/ca.key" \
    -ip "192.168.100.10/24"
Now to the configuration. The project repository provides a template.
The configuration is divided into individual blocks (pki, static_host_map, lighthouse, listen, tun, and firewall).
The first section covers the PKI setup. Besides the root CA certificate, the node certificate, and the key, you can also create blacklists here if you no longer trust a node certificate.
pki:
  # The CAs that are accepted by this node. Must contain one or more certificates created by 'nebula-cert ca'
  ca: /etc/nebula/ca.crt
  cert: /etc/nebula/host.crt
  key: /etc/nebula/host.key
  #blacklist is a list of certificate fingerprints that we will refuse to talk to
  #blacklist:
  #  - c99d4e650533b92061b09918e838a5a0a6aaee21eed1d12fd937682865936c72
The next block creates a static host map. This is the initial mapping every client uses to find peers.
This is where the mapping of the individual lighthouse nodes should be entered.
Every lighthouse node should have a static, public IP address, which is mapped here to its internal IP.
# The syntax is:
#   "{nebula ip}": ["{routable ip/dns name}:{routable port}"]
# Example, if your lighthouse has the nebula IP of 192.168.100.1 and has the real ip address of 100.64.22.11 and runs on port 4242:
static_host_map:
  "192.168.100.10": ["100.64.22.11:4242"]
The next block is the configuration necessary for a lighthouse node.
Either a node is a lighthouse, or the node receives a list of all lighthouse IPs.
lighthouse:
  am_lighthouse: true
  interval: 60
  # hosts is a list of lighthouse hosts this node should report to and query from
  # IMPORTANT: THIS SHOULD BE EMPTY ON LIGHTHOUSE NODES
  hosts:
Furthermore, you can define the (UDP) ports over which the mesh is built. This is a critical setting for lighthouse nodes – they should always be reachable. All other nodes can also have this assigned dynamically.
# Port Nebula will be listening on. The default here is 4242. For a lighthouse node, the port should be defined,
# however using port 0 will dynamically assign a port and is recommended for roaming nodes.
listen:
  host: 0.0.0.0
  port: 4242

# Punchy continues to punch inbound/outbound at a regular interval to avoid expiration of firewall nat mappings
punchy: true
Next is a block in which the network device can be configured.
# Configure the private interface. Note: addr is baked into the nebula certificate
tun:
  dev: lighthouse1
  drop_local_broadcast: false
  drop_multicast: false
  tx_queue: 500
  mtu: 1300
  routes:
  unsafe_routes:
As well as the logging:
logging:
  # panic, fatal, error, warning, info, or debug. Default is info
  level: info
  # json or text formats currently available. Default is text
  format: text
At the end there is also a firewall block.
This configuration controls the security of the individual nodes within the VPN’s internal network (192.168.100.0/24).
Each client creates its own firewall for the VPN interface. This controls which ports are open and which client groups have access to these ports.
The lighthouse node should only be reachable via ping cmd (icmp). And it should allow all outbound traffic.
For the other nodes, we will use a more detailed configuration.
firewall:
  conntrack:
    tcp_timeout: 120h
    udp_timeout: 3m
    default_timeout: 10m
    max_connections: 100000

  outbound:
    # Allow all outbound traffic from this node
    - port: any
      proto: any
      host: any

  inbound:
    # Allow icmp between any nebula hosts
    - port: any
      proto: icmp
      host: any
At the end we can start our lighthouse node. Since we need to create a network device, this requires elevated access rights.
$ sudo nebula -config /etc/nebula/lighthouse/config.yml
INFO[0000] Firewall rule added                           firewallRule="map[caName: caSha: direction:outgoing endPort:0 groups:[] host:any ip:<nil> proto:0 startPort:0]"
INFO[0000] Firewall rule added                           firewallRule="map[caName: caSha: direction:incoming endPort:0 groups:[] host:any ip:<nil> proto:1 startPort:0]"
INFO[0000] Firewall started                              firewallHash=65f8f5d1040b999e7d2d649c3632594c0e7d57d8abd186855307c23fdfe10c03
INFO[0000] Main HostMap created                          network=192.168.100.10/24 preferredRanges="[]"
INFO[0000] UDP hole punching enabled
INFO[0000] Nebula interface is active                    build=1.1.0 interface=lighthouse.cons network=192.168.100.10/24
Setting up the Remaining Nodes
The client configuration works in a similar way to the lighthouse (remember: it is a peer2peer VPN, a lighthouse is just a client as well).
It is important that our lighthouse is still entered as a static host in the config.yml:
# The syntax is:
#   "{nebula ip}": ["{routable ip/dns name}:{routable port}"]
# Example, if your lighthouse has the nebula IP of 192.168.100.1 and has the real ip address of 100.64.22.11 and runs on port 4242:
static_host_map:
  "192.168.100.10": ["100.64.22.11:4242"]
What does differ, though, is the lighthouse block in the config.yml:
lighthouse:
  # am_lighthouse is used to enable lighthouse functionality for a node. This should ONLY be true on nodes
  # you have configured to be lighthouses in your network
  am_lighthouse: false
  # serve_dns optionally starts a dns listener that responds to various queries and can even be
  # delegated to for resolution
  #serve_dns: false
  #dns:
    # The DNS host defines the IP to bind the dns listener to. This also allows binding to the nebula node IP.
    #host: 0.0.0.0
    #port: 53
  # interval is the number of seconds between updates from this node to a lighthouse.
  # during updates, a node sends information about its current IP addresses to each node.
  interval: 60
  # hosts is a list of lighthouse hosts this node should report to and query from
  # IMPORTANT: THIS SHOULD BE EMPTY ON LIGHTHOUSE NODES
  hosts:
    - "192.168.100.10"
The current client is not a lighthouse. The IP 192.168.100.10 is the (VPN) internal IP of our lighthouse node, to which our client can announce other peer2peer nodes.
Since the nodes with the services (service.prod and service.dev) contain additional firewall rules, we add the firewall block to their config.yml file:
firewall:
  conntrack:
    tcp_timeout: 120h
    udp_timeout: 3m
    default_timeout: 10m
    max_connections: 100000

  outbound:
    # Allow all outbound traffic from this node
    - port: any
      proto: any
      host: any

  inbound:
    # Allow icmp between any nebula hosts
    - port: any
      proto: icmp
      host: any

    # Allow tcp/443 from any host within the VPN
    - port: 443
      proto: tcp
      host: any
The next block for SSH now differs for service.dev and service.prod respectively:
service.prod:
# Allows tcp/22 from any host with group support-prod
    - port: 22
      proto: tcp
      groups:
        - support-prod
service.dev:
# Allows tcp/22 from any host with group support-dev
    - port: 22
      proto: tcp
      groups:
        - support-dev
Theoretically, several groups can also be combined here.
The rest of the configuration is identical.
So that our rules above actually take effect, we must of course use the corresponding groups when creating the client certificates. In addition, it is advisable to limit the validity of the certificates – e.g. to two weeks (336 hours) for mobile clients, or 6 months (4032 hours) for the services.
For our production service, the command now looks like this:
$ ./nebula-cert sign \
    -name "service.prod" \
    -ca-crt "certs/ca.crt" \
    -ca-key "certs/ca.key" \
    -ip "192.168.100.20/24" \
    -duration "4032h"
The remaining commands are now put together as follows:
$ ./nebula-cert sign -name "service.dev" \
    -ip "192.168.100.30/24" \
    -ca-crt "certs/ca.crt" -ca-key "certs/ca.key" \
    -duration "4032h"

# The clients

$ ./nebula-cert sign -name "anna" -groups "dev,support-dev,support-prod" \
    -ip "192.168.100.101/24" \
    -ca-crt "certs/ca.crt" -ca-key "certs/ca.key" \
    -duration "336h"
$ ./nebula-cert sign -name "anton" -groups "dev,support-dev" \
    -ip "192.168.100.102/24" \
    -ca-crt "certs/ca.crt" -ca-key "certs/ca.key"\
     -duration "336h"
We now have a pair of crt and key files for each configured client. Both files can now be packaged with the binary of the respective platform and distributed for provisioning.
The other nodes are started with the same command as the lighthouse node:
$ sudo nebula -config /etc/nebula/service.prod/config.yml
INFO[0000] Firewall rule added                           firewallRule="map[caName: caSha: direction:outgoing endPort:0 groups:[] host:any ip:<nil> proto:0 startPort:0]"
INFO[0000] Firewall rule added                           firewallRule="map[caName: caSha: direction:incoming endPort:0 groups:[] host:any ip:<nil> proto:1 startPort:0]"
INFO[0000] Firewall rule added                           firewallRule="map[caName: caSha: direction:incoming endPort:443 groups:[] host:any ip:<nil> proto:6 startPort:443]"
INFO[0000] Firewall rule added                           firewallRule="map[caName: caSha: direction:incoming endPort:22 groups:[support-prod] host: ip:<nil> proto:6 startPort:22]"
INFO[0000] Firewall started                              firewallHash=a098fb9d76aa8b5004f10ebde29bbecf9755d57680e28e07653a508ede541fe3
INFO[0000] Main HostMap created                          network=192.168.100.20/24 preferredRanges="[]"
INFO[0000] UDP hole punching enabled
INFO[0000] Nebula interface is active                    build=1.1.0 interface=utun4 network=192.168.100.20/24
INFO[0000] Handshake message sent                        handshake="map[stage:1 style:ix_psk0]" initiatorIndex=119518810 remoteIndex=0 udpAddr="100.64.22.11:4242" vpnIp=192.168.100.10
...
We can see that besides a different IP, the other firewall rules are displayed as well. What also differs is the handshake request to the configured lighthouse node.
Conclusion
In recent weeks, reports about limited possibilities for remote work due to infrastructure constraints have increased significantly.
The centralized solutions acquired so far are not sized for broad use.
Central dial-in nodes always represent a potential bottleneck.
With Nebula, Slack has published a VPN approach as OSS that has proven in Slack’s own production setup that it can keep up with other commercial products in terms of throughput, stability, and coordination.
ArsTechnica mentions some critical points in their article, which I can also agree with:
- The setup is still not easy to use for an end user. So far there are neither suitable launchers nor UI applications that enable easy dial-in, as other comparable products do.
- Windows needs additional components (tap-windows6 driver) to dial into a Nebula VPN.
It remains positive to emphasize that:
- The throughput is high compared to other peer2peer VPNs.
- The software is completely open source.
- Dial-in is secured via certificates (which have an expiry date).
- Thanks to the P2P approach, this solution scales significantly better than centralized approaches with dial-in nodes.
Meanwhile, Nebula is also used on other levels. The Jitsi nodes of Freifunk Munich are now connected via an internal Nebula VPN. There will surely be further findings from the tests in the foreseeable future.
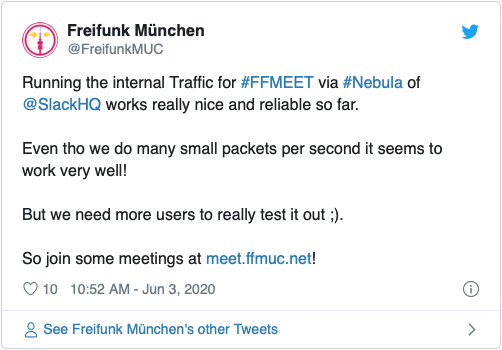
https://twitter.com/FreifunkMUC/status/1268103249330089984
As a last point, a modern system architecture should preferably do without securing itself via a VPN.
A Zero-Trust approach is certainly desirable here and also makes it possible to open up your own service offering to further parties at a later point, without any further adjustments being necessary.
This article was originally published on the INNOQ blog.
Leave a Reply